前言
差不多是一个月前摸了摸 AOSP 自动亮度相关的东西,这篇文章主要是对当时得到的一些结论进行整理。
省流助手:自动亮度的代码框架 / 自动亮度策略 / 如何学习用户偏好 / AOSP “自适应亮度”机器学习是骗局
AOSP 自动亮度的代码是一个大屎山,特别是 DisplayPowerController 中的 updatePowerState() 部分,看着就让人犯恶心,因此本文主要注重于描述“某一部分代码大概干了什么事情”,而不会深入屎山去讨论“这个 temporary 变量是干嘛用的?这个 pending 又是怎么更新的?”
本文基于 Android 12L 讨论。
本文仅针对 AOSP,被任何 OEM 修改过的 ROM 甚至是谷歌 Pixel 的自带系统,都有可能具有与文章描述不符合的行为。
把握代码框架
面对屎山,我认为找到其出入口是最为重要的,顺着出入口能弄清楚不少东西,至于中间那些糊不清楚的屎就算了,只需要知道它们能跌跌撞撞的正常运行就够了。对于自动亮度,它的入口有好几个:光线传感器的读数、配置文件的读取 以及 用户的输入。而它的出口就只有一个,那就是改变屏幕亮度。
传感器读数从何输入?
services/core/java/com/android/server/display/AutomaticBrightnessController.java
    private final SensorEventListener mLightSensorListener = new SensorEventListener() {
        @Override
        public void onSensorChanged(SensorEvent event) {
            if (mLightSensorEnabled) {
                final long time = SystemClock.uptimeMillis();
                final float lux = event.values[0];
                handleLightSensorEvent(time, lux);
            }
        }

        @Override
        public void onAccuracyChanged(Sensor sensor, int accuracy) {
            // Not used.
        }
    };
顺藤摸瓜
顺着摸,我们能够了解到 AutomaticBrightnessController 大概干了些什么事情。
    private void handleLightSensorEvent(long time, float lux) {
        ......

        if (mAmbientLightRingBuffer.size() == 0) {
            ......
        }
        ......
        updateAmbientLux(time);
    }
看起来它维护了一个环形缓冲区,这很好理解,毕竟采集到的数据肯定不能直接使用,至少也得消抖啥的吧。
接着往下摸。
    private void updateAmbientLux(long time) {
        // If the light sensor was just turned on then immediately update our initial
        // estimate of the current ambient light level.
        if (!mAmbientLuxValid) {
            ......
            updateAutoBrightness(true /* sendUpdate */, false /* isManuallySet */);
        }

        ......
        // Essentially, we calculate both a slow ambient lux, to ensure there's a true long-term
        // change in lighting conditions, and a fast ambient lux to determine what the new
        // brightness situation is since the slow lux can be quite slow to converge.
        //
        // Note that both values need to be checked for sufficient change before updating the
        // proposed ambient light value since the slow value might be sufficiently far enough away
        // from the fast value to cause a recalculation while its actually just converging on
        // the fast value still.
        ......

        if ((slowAmbientLux >= mAmbientBrighteningThreshold
                && fastAmbientLux >= mAmbientBrighteningThreshold
                && nextBrightenTransition <= time)
                || (slowAmbientLux <= mAmbientDarkeningThreshold
                        && fastAmbientLux <= mAmbientDarkeningThreshold
                        && nextDarkenTransition <= time)) {
            ......
            updateAutoBrightness(true /* sendUpdate */, false /* isManuallySet */);
            ......
        }
        ......
        // If one of the transitions is ready to occur, but the total weighted ambient lux doesn't
        // exceed the necessary threshold, then it's possible we'll get a transition time prior to
        // now. Rather than continually checking to see whether the weighted lux exceeds the
        // threshold, schedule an update for when we'd normally expect another light sample, which
        // should be enough time to decide whether we should actually transition to the new
        // weighted ambient lux or not.
        ......
    }
看来我上面所言极是,这个方法压根不用细看,看注释就知道是在实现某些算法对输入的亮度数据进行处理。
现在我们只关心整体框架,那么它又是如何往下走的呢?
    private void updateAutoBrightness(boolean sendUpdate, boolean isManuallySet) {
        ......

        float value = mBrightnessMapper.getBrightness(mAmbientLux, mForegroundAppPackageName,
                mForegroundAppCategory);
        float newScreenAutoBrightness = clampScreenBrightness(value);

        ......
        if (!BrightnessSynchronizer.floatEquals(mScreenAutoBrightness,
                newScreenAutoBrightness)) {
            ......
            if (sendUpdate) {
                mCallbacks.updateBrightness();
            }
        }
    }
它似乎把环境亮度数据交给了 mBrightnessMapper,然后从它那里拿到了适合的屏幕亮度值,最后调用 mCallbacks.updateBrightness() 执行了亮度更新。
这里的 mCallbacks 中的其中一个成员是 DisplayPowerController,于是到这里 AutomaticBrightnessController 的工作就结束了。
可以概括一下它干了什么:从传感器处获得数据,对数据进行预处理,将处理得到的环境亮度交给 mBrightnessMapper 得到合适的屏幕亮度,最后调用 DisplayPowerController 更新屏幕亮度结束这一周期的工作。
(当然,这里的调用 DisplayPowerController并不是很干净的单向调用,它只是通知其该更新屏幕亮度了,然后 DisplayPowerController 会在适宜的时间反向调用回 AutomaticBrightnessController 读取之前得到的那些数据)
逆藤摸瓜
逆着摸,我们还能够找到传感器的由来。
services/core/java/com/android/server/display/DisplayPowerController.java
        DisplayDeviceConfig.SensorData lightSensor = mDisplayDeviceConfig.getAmbientLightSensor();
        ......
        mLightSensor = SensorUtils.findSensor(mSensorManager, lightSensor.type, lightSensor.name,
                fallbackType);
core/res/res/values/config.xml
    <!-- The type of the light sensor to be used by the display framework for things like
         auto-brightness. If unset, then it just gets the default sensor of type TYPE_LIGHT. -->
    <string name="config_displayLightSensorType" translatable="false" />
可以看到,我们可以通过 overlay 来配置目标传感器的 type ,但是也仅限 type ,这个配置似乎是毫无意义的(毕竟光线传感器也就只能是这个类型吧)。
默认情况下,SensorUtils.findSensor() 会返回首个符合 type 要求的传感器。
这也就意味着,到目前为止 AOSP 并不支持某些手机所具有的前后多光感,它只会选择一个光线传感器的读数作为参考。
(不过,这里的 type 是 string type 而不是 int type ,因此如果想要在多个光感中指定一个,可以尝试在 sensor hal 中将一个光感改名?)(手里的万普拉斯虽然传说有后置光感,但是各种检测软件根本看不到,怀疑是拿摄像头充数的)
配置被谁读取?
众所周知,device tree 中往往有一大堆 overlay 来配置自动亮度的相关参数。
core/res/res/values/config.xml
    ......
    <!-- Allow automatic adjusting of the screen brightness while dozing in low power state. -->
    <bool name="config_allowAutoBrightnessWhileDozing">false</bool>

    <!-- Stability requirements in milliseconds for accepting a new brightness level.  This is used
         for debouncing the light sensor.  Different constants are used to debounce the light sensor
         when adapting to brighter or darker environments.  This parameter controls how quickly
         brightness changes occur in response to an observed change in light level that exceeds the
         hysteresis threshold. -->
    <integer name="config_autoBrightnessBrighteningLightDebounce">4000</integer>
    <integer name="config_autoBrightnessDarkeningLightDebounce">8000</integer>

    <!-- Initial light sensor event rate in milliseconds for automatic brightness control. This is
         used for obtaining the first light sample when the device stops dozing.

         Set this to -1 to disable this feature. -->
    <integer name="config_autoBrightnessInitialLightSensorRate">-1</integer>

    <!-- Light sensor event rate in milliseconds for automatic brightness control. -->
    <integer name="config_autoBrightnessLightSensorRate">250</integer>

    <!-- The maximum range of gamma adjustment possible using the screen
         auto-brightness adjustment setting. -->
    <fraction name="config_autoBrightnessAdjustmentMaxGamma">300%</fraction>

    <!-- If we allow automatic adjustment of screen brightness while dozing, how many times we want
         to reduce it to preserve the battery. Value of 100% means no scaling. -->
    <fraction name="config_screenAutoBrightnessDozeScaleFactor">100%</fraction>

    <!-- When the screen is turned on, the previous estimate of the ambient light level at the time
         the screen was turned off is restored and is used to determine the initial screen
         brightness.

         If this flag is true, then the ambient light level estimate will be promptly recomputed
         after the warm-up interface and the screen brightness will be adjusted immediately.

         If this flag is false, then the ambient light level estimate will be adjusted more
         gradually in the same manner that normally happens when the screen is on according to the
         brightening or dimming debounce thresholds.  As a result, it may take somewhat longer to
         adapt to the environment.  This mode may be better suited for watches. -->
    <bool name="config_autoBrightnessResetAmbientLuxAfterWarmUp">true</bool>

    <!-- Screen brightness used to dim the screen when the user activity
         timeout expires.  May be less than the minimum allowed brightness setting
         that can be set by the user. -->
    <integer name="config_screenBrightnessDim">10</integer>
    <item name="config_screenBrightnessDimFloat" format="float" type="dimen">0.05</item>

    <!-- If the screen brightness is already set at or below config_screenBrightnessDim, and the
         user activity timeout expires, we still want to dim the screen slightly to indicate that
         the device is about to go to sleep. The screen will dim by this amount in that case.
         -->
    <item name="config_screenBrightnessMinimumDimAmountFloat" format="float" type="dimen">0.04</item>

    <!-- Minimum allowable screen brightness to use in a very dark room.
         This value sets the floor for the darkest possible auto-brightness
         adjustment.  It is expected to be somewhat less than the first entry in
         config_autoBrightnessLcdBacklightValues so as to allow the user to have
         some range of adjustment to dim the screen further than usual in very
         dark rooms. The contents of the screen must still be clearly visible
         in darkness (although they may not be visible in a bright room). -->
    <integer name="config_screenBrightnessDark">1</integer>

    <!-- Array of lux values to define the minimum brightness curve, which guarantees that any
         brightness curve that dips below it is rejected by the system.
         This prevents auto-brightness from setting the screen so dark as to prevent the user from
         resetting or disabling it.

         The values must be non-negative and strictly increasing, and correspond to the values in
         the config_minimumBrightnessCurveNits array. -->
    <array name="config_minimumBrightnessCurveLux">
        <item>0.0</item>
        <item>2000.0</item>
        <item>4000.0</item>
    </array>

    <!-- Array of nits values to define the minimum brightness curve, which guarantees that any
         brightness curve that dips below it is rejected by the system.
         This should map lux to the absolute minimum nits that are still readable in that ambient
         brightness.

         The values must be non-negative and non-decreasing, and correspond to the values in the
         config_minimumBrightnessCurveLux array. -->
    <array name="config_minimumBrightnessCurveNits">
        <item>0.0</item>
        <item>50.0</item>
        <item>90.0</item>
    </array>

    <!-- Array of light sensor lux values to define our levels for auto backlight brightness support.
         The N entries of this array define N + 1 control points as follows:
         (1-based arrays)

         Point 1:            (0, value[1]):             lux <= 0
         Point 2:     (level[1], value[2]):  0        < lux <= level[1]
         Point 3:     (level[2], value[3]):  level[2] < lux <= level[3]
         ...
         Point N+1: (level[N], value[N+1]):  level[N] < lux

         The control points must be strictly increasing.  Each control point
         corresponds to an entry in the brightness backlight values arrays.
         For example, if lux == level[1] (first element of the levels array)
         then the brightness will be determined by value[2] (second element
         of the brightness values array).

         Spline interpolation is used to determine the auto-brightness
         backlight values for lux levels between these control points.

         Must be overridden in platform specific overlays -->
    <integer-array name="config_autoBrightnessLevels">
    </integer-array>

    <!-- Timeout (in milliseconds) after which we remove the effects any user interactions might've
         had on the brightness mapping. This timeout doesn't start until we transition to a
         non-interactive display policy so that we don't reset while users are using their devices,
         but also so that we don't erroneously keep the short-term model if the device is dozing
         but the display is fully on. -->
    <integer name="config_autoBrightnessShortTermModelTimeout">300000</integer>

    <!-- Array of output values for LCD backlight corresponding to the lux values
         in the config_autoBrightnessLevels array.  This array should have size one greater
         than the size of the config_autoBrightnessLevels array.
         The brightness values must be between 0 and 255 and be non-decreasing.
         This must be overridden in platform specific overlays -->
    <integer-array name="config_autoBrightnessLcdBacklightValues">
    </integer-array>

    <!-- Array of desired screen brightness in nits corresponding to the lux values
         in the config_autoBrightnessLevels array. As with config_screenBrightnessMinimumNits and
         config_screenBrightnessMaximumNits, the display brightness is defined as the measured
         brightness of an all-white image.

         If this is defined then:
            - config_autoBrightnessLcdBacklightValues should not be defined
            - config_screenBrightnessNits must be defined
            - config_screenBrightnessBacklight must be defined

         This array should have size one greater than the size of the config_autoBrightnessLevels
         array. The brightness values must be non-negative and non-decreasing. This must be
         overridden in platform specific overlays -->
    <array name="config_autoBrightnessDisplayValuesNits">
    </array>

    <!-- Array of output values for button backlight corresponding to the luX values
         in the config_autoBrightnessLevels array.  This array should have size one greater
         than the size of the config_autoBrightnessLevels array.
         The brightness values must be between 0 and 255 and be non-decreasing.
         This must be overridden in platform specific overlays -->
    <integer-array name="config_autoBrightnessButtonBacklightValues">
    </integer-array>

    <!-- Array of output values for keyboard backlight corresponding to the lux values
         in the config_autoBrightnessLevels array.  This array should have size one greater
         than the size of the config_autoBrightnessLevels array.
         The brightness values must be between 0 and 255 and be non-decreasing.
         This must be overridden in platform specific overlays -->
    <integer-array name="config_autoBrightnessKeyboardBacklightValues">
    </integer-array>

    <!-- An array describing the screen's backlight values corresponding to the brightness
         values in the config_screenBrightnessNits array.

         This array should be equal in size to config_screenBrightnessBacklight. -->
    <integer-array name="config_screenBrightnessBacklight">
    </integer-array>

    <!-- An array of floats describing the screen brightness in nits corresponding to the backlight
         values in the config_screenBrightnessBacklight array.  On OLED displays these  values
         should be measured with an all white image while the display is in the fully on state.
         Note that this value should *not* reflect the maximum brightness value for any high
         brightness modes but only the maximum brightness value obtainable in a sustainable manner.

         This array should be equal in size to config_screenBrightnessBacklight -->
    <array name="config_screenBrightnessNits">
    </array>

    <!-- Array of ambient lux threshold values. This is used for determining hysteresis constraint
         values by calculating the index to use for lookup and then setting the constraint value
         to the corresponding value of the array. The new brightening hysteresis constraint value
         is the n-th element of config_ambientBrighteningThresholds, and the new darkening
         hysteresis constraint value is the n-th element of config_ambientDarkeningThresholds.

         The (zero-based) index is calculated as follows: (MAX is the largest index of the array)
         condition                       calculated index
         value < level[0]                0
         level[n] <= value < level[n+1]  n+1
         level[MAX] <= value             MAX+1 -->
    <integer-array name="config_ambientThresholdLevels">
    </integer-array>

    <!-- Array of hysteresis constraint values for brightening, represented as tenths of a
         percent. The length of this array is assumed to be one greater than
         config_ambientThresholdLevels. The brightening threshold is calculated as
         lux * (1.0f + CONSTRAINT_VALUE). When the current lux is higher than this threshold,
         the screen brightness is recalculated. See the config_ambientThresholdLevels
         description for how the constraint value is chosen. -->
    <integer-array name="config_ambientBrighteningThresholds">
        <item>100</item>
    </integer-array>

    <!-- Array of hysteresis constraint values for darkening, represented as tenths of a
         percent. The length of this array is assumed to be one greater than
         config_ambientThresholdLevels. The darkening threshold is calculated as
         lux * (1.0f - CONSTRAINT_VALUE). When the current lux is lower than this threshold,
         the screen brightness is recalculated. See the config_ambientThresholdLevels
         description for how the constraint value is chosen. -->
    <integer-array name="config_ambientDarkeningThresholds">
        <item>200</item>
    </integer-array>

    <!-- Array of screen brightness threshold values. This is used for determining hysteresis
         constraint values by calculating the index to use for lookup and then setting the
         constraint value to the corresponding value of the array. The new brightening hysteresis
         constraint value is the n-th element of config_screenBrighteningThresholds, and the new
         darkening hysteresis constraint value is the n-th element of
         config_screenDarkeningThresholds.

         The (zero-based) index is calculated as follows: (MAX is the largest index of the array)
         condition                       calculated index
         value < level[0]                0
         level[n] <= value < level[n+1]  n+1
         level[MAX] <= value             MAX+1 -->
    <integer-array name="config_screenThresholdLevels">
    </integer-array>

    <!-- Array of hysteresis constraint values for brightening, represented as tenths of a
         percent. The length of this array is assumed to be one greater than
         config_screenThresholdLevels. The brightening threshold is calculated as
         screenBrightness * (1.0f + CONSTRAINT_VALUE). When the new screen brightness is higher
         than this threshold, it is applied. See the config_screenThresholdLevels description for
         how the constraint value is chosen. -->
    <integer-array name="config_screenBrighteningThresholds">
        <item>100</item>
    </integer-array>

    <!-- Array of hysteresis constraint values for darkening, represented as tenths of a
         percent. The length of this array is assumed to be one greater than
         config_screenThresholdLevels. The darkening threshold is calculated as
         screenBrightness * (1.0f - CONSTRAINT_VALUE). When the new screen brightness is lower than
         this threshold, it is applied. See the config_screenThresholdLevels description for how
         the constraint value is chosen. -->
    <integer-array name="config_screenDarkeningThresholds">
        <item>200</item>
    </integer-array>

    <!-- Amount of time it takes for the light sensor to warm up in milliseconds.
         For this time after the screen turns on, the Power Manager
         will not debounce light sensor readings -->
    <integer name="config_lightSensorWarmupTime">0</integer>
    ......
那么这些资源究竟在何处被取走了呢?
大概搜索了一下,主要是 DisplayPowerController、BrightnessMappingStrategy 和 DisplayDeviceConfig。前两个都在上面出现过了。
services/core/java/com/android/server/display/DisplayDeviceConfig.java
    private void loadBrightnessMapFromConfigXml() {
        ......
        final float[] sysNits = BrightnessMappingStrategy.getFloatArray(res.obtainTypedArray(
                com.android.internal.R.array.config_screenBrightnessNits));
        final int[] sysBrightness = res.getIntArray(
                com.android.internal.R.array.config_screenBrightnessBacklight);
        final float[] sysBrightnessFloat = new float[sysBrightness.length];
        ......
    }
services/core/java/com/android/server/display/BrightnessMappingStrategy.java
    public static BrightnessMappingStrategy create(Resources resources,
            DisplayDeviceConfig displayDeviceConfig, float adjustment) {

        // Display independent values
        float[] luxLevels = getLuxLevels(resources.getIntArray(
                com.android.internal.R.array.config_autoBrightnessLevels));
        int[] brightnessLevelsBacklight = resources.getIntArray(
                com.android.internal.R.array.config_autoBrightnessLcdBacklightValues);
        float[] brightnessLevelsNits = getFloatArray(resources.obtainTypedArray(
                com.android.internal.R.array.config_autoBrightnessDisplayValuesNits));
        float autoBrightnessAdjustmentMaxGamma = resources.getFraction(
                com.android.internal.R.fraction.config_autoBrightnessAdjustmentMaxGamma,
                1, 1);
        long shortTermModelTimeout = resources.getInteger(
                com.android.internal.R.integer.config_autoBrightnessShortTermModelTimeout);

        // Display dependent values - used for physical mapping strategy nits -> brightness
        final float[] nitsRange = displayDeviceConfig.getNits();
        final float[] brightnessRange = displayDeviceConfig.getBrightness();
        ......
    }
services/core/java/com/android/server/display/DisplayPowerController.java
    private void setUpAutoBrightness(Resources resources, Handler handler) {
        ......

        mBrightnessMapper = BrightnessMappingStrategy.create(
                resources, mDisplayDeviceConfig, getAutoBrightnessAdjustmentSetting());

        if (mBrightnessMapper != null) {
            final float dozeScaleFactor = resources.getFraction(
                    com.android.internal.R.fraction.config_screenAutoBrightnessDozeScaleFactor,
                    1, 1);

            int[] ambientBrighteningThresholds = resources.getIntArray(
                    com.android.internal.R.array.config_ambientBrighteningThresholds);
            int[] ambientDarkeningThresholds = resources.getIntArray(
                    com.android.internal.R.array.config_ambientDarkeningThresholds);
            int[] ambientThresholdLevels = resources.getIntArray(
                    com.android.internal.R.array.config_ambientThresholdLevels);
            float ambientDarkeningMinThreshold =
                    mDisplayDeviceConfig.getAmbientLuxDarkeningMinThreshold();
            float ambientBrighteningMinThreshold =
                    mDisplayDeviceConfig.getAmbientLuxBrighteningMinThreshold();
            HysteresisLevels ambientBrightnessThresholds = new HysteresisLevels(
                    ambientBrighteningThresholds, ambientDarkeningThresholds,
                    ambientThresholdLevels, ambientDarkeningMinThreshold,
                    ambientBrighteningMinThreshold);

            int[] screenBrighteningThresholds = resources.getIntArray(
                    com.android.internal.R.array.config_screenBrighteningThresholds);
            int[] screenDarkeningThresholds = resources.getIntArray(
                    com.android.internal.R.array.config_screenDarkeningThresholds);
            int[] screenThresholdLevels = resources.getIntArray(
                    com.android.internal.R.array.config_screenThresholdLevels);
            float screenDarkeningMinThreshold =
                    mDisplayDeviceConfig.getScreenDarkeningMinThreshold();
            float screenBrighteningMinThreshold =
                    mDisplayDeviceConfig.getScreenBrighteningMinThreshold();
            HysteresisLevels screenBrightnessThresholds = new HysteresisLevels(
                    screenBrighteningThresholds, screenDarkeningThresholds, screenThresholdLevels,
                    screenDarkeningMinThreshold, screenBrighteningMinThreshold);

            long brighteningLightDebounce = resources.getInteger(
                    com.android.internal.R.integer.config_autoBrightnessBrighteningLightDebounce);
            long darkeningLightDebounce = resources.getInteger(
                    com.android.internal.R.integer.config_autoBrightnessDarkeningLightDebounce);
            boolean autoBrightnessResetAmbientLuxAfterWarmUp = resources.getBoolean(
                    com.android.internal.R.bool.config_autoBrightnessResetAmbientLuxAfterWarmUp);

            int lightSensorWarmUpTimeConfig = resources.getInteger(
                    com.android.internal.R.integer.config_lightSensorWarmupTime);
            int lightSensorRate = resources.getInteger(
                    com.android.internal.R.integer.config_autoBrightnessLightSensorRate);
            int initialLightSensorRate = resources.getInteger(
                    com.android.internal.R.integer.config_autoBrightnessInitialLightSensorRate);
            if (initialLightSensorRate == -1) {
                initialLightSensorRate = lightSensorRate;
            } else if (initialLightSensorRate > lightSensorRate) {
                Slog.w(TAG, "Expected config_autoBrightnessInitialLightSensorRate ("
                        + initialLightSensorRate + ") to be less than or equal to "
                        + "config_autoBrightnessLightSensorRate (" + lightSensorRate + ").");
            }

            loadAmbientLightSensor();
            if (mBrightnessTracker != null) {
                mBrightnessTracker.setLightSensor(mLightSensor);
            }

            if (mAutomaticBrightnessController != null) {
                mAutomaticBrightnessController.stop();
            }
            mAutomaticBrightnessController = new AutomaticBrightnessController(this,
                    handler.getLooper(), mSensorManager, mLightSensor, mBrightnessMapper,
                    lightSensorWarmUpTimeConfig, PowerManager.BRIGHTNESS_MIN,
                    PowerManager.BRIGHTNESS_MAX, dozeScaleFactor, lightSensorRate,
                    initialLightSensorRate, brighteningLightDebounce, darkeningLightDebounce,
                    autoBrightnessResetAmbientLuxAfterWarmUp, ambientBrightnessThresholds,
                    screenBrightnessThresholds, mLogicalDisplay, mContext, mHbmController);
        } else {
            mUseSoftwareAutoBrightnessConfig = false;
        }
    }
读了些什么?
BrightnessMappingStrategy 所读取的配置是很有特点的,它读取的表正是自动亮度调节的关键——这几个表决定了从环境光到屏幕亮度等级的映射关系 (后面会详细解释)。这与我们上方对 AutomaticBrightnessController 的分析非常符合,在其中 BrightnessMappingStrategy 被用于完成从传感器读数到屏幕亮度的转换。
DisplayDeviceConfig 所读取的东西也是很有特点的——它们描述了屏幕的物理特性。在自动亮度中,它所读取的配置会被直接提供给 BrightnessMappingStrategy,因此接下来不会再围绕它展开讨论(后面会详细解释这些物理特性在亮度映射中的用途)。
DisplayPowerController 读取的东西不是很好总结(阈值、消抖、传感器参数等),但相对于上面的表只能算是“边角料”了罢。
“三大组件”之间的关系
我们在此定义 DisplayPowerController、BrightnessMappingStrategy、AutomaticBrightnessController 为自动亮度中的三大组件,这三大组件在上方的传感器摸瓜中都已经出现过了。(“三大组件”没有包含上面只出现了一瞬间的 DisplayDeviceConfig ,不过怎么叫无所谓,仅仅只是因为它们在自动亮度中十分关键罢了)
上面的初始化代码中除了有被读取的资源,其实也在暗暗告诉我们三大组件之间的关系。
可以看到 BrightnessMappingStrategy 是由 DisplayPowerController 创建的,并且后者一直持有前者的对象。
AutomaticBrightnessController 是由 DisplayPowerController 创建的,创建过程中传入了刚刚创建并持有的 BrightnessMappingStrategy 对象。并且,传入了几乎所有读到的“边角料”参数(那为什么不让 AutomaticBrightnessController 直接读这些参数呢?)。毕竟AutomaticBrightnessController所作的事情就是从传感器读取数据与数据预处理,自然非常需要这些参数,这与我们上方从传感器读数开始的分析非常符合。
屏幕亮度如何改变?
这里我觉得没必要挖的太深(比如挖到内核里是如何改变屏幕亮度的),仅仅只需要找到一个“能直接改变屏幕亮度,过程没啥东西掺和”的方法就可以了。
大概看了一圈,这个方法位于
services/core/java/com/android/server/display/DisplayPowerState.java
    /**
     * Sets the display brightness.
     *
     * @param brightness The brightness, ranges from 0.0f (minimum) to 1.0f (brightest), or is -1f
     *                   (off).
     */
    public void setScreenBrightness(float brightness) {
        if (mScreenBrightness != brightness) {
            if (DEBUG) {
                Slog.d(TAG, "setScreenBrightness: brightness=" + brightness);
            }

            mScreenBrightness = brightness;
            if (mScreenState != Display.STATE_OFF) {
                mScreenReady = false;
                scheduleScreenUpdate();
            }
        }
    }
这个方法并没有那么底层,但大概也符合要求了,就从这里回溯看看自动亮度调节是怎么调用到这里的。
向上回溯:
services/core/java/com/android/server/display/DisplayPowerState.java
    public static final FloatProperty<DisplayPowerState> SCREEN_BRIGHTNESS_FLOAT =
            new FloatProperty<DisplayPowerState>("screenBrightnessFloat") {
                @Override
                public void setValue(DisplayPowerState object, float value) {
                    object.setScreenBrightness(value);
                }

                @Override
                public Float get(DisplayPowerState object) {
                    return object.getScreenBrightness();
                }
            };
它的直接调用者是一个 FloatProperty。你可以这样理解 FloatProperty :它将一对 setter 和 getter 绑定在了一个浮点数上,对本案例来说,屏幕亮度就是这个浮点数,当对浮点数执行读取时,会自动调用获取屏幕亮度的方法并返回其值,当对浮点数进行赋值时,会自动调用设置屏幕亮度的方法(当然,这个浮点数是特殊的,不能直接读写,得调用对应的 setValue() 和 get() 方法)。或者,干脆把它理解为对屏幕亮度读写方法的打包,谁拿到了它,谁就掌握了任意改变屏幕亮度的控制权。
xxxProperty 一般在动画中比较常用,比如你想要改变 View 的某个属性,那就把这个属性的 get 和 set 方法打包成一个 xxxProperty,传到动画里,于是动画就能连续的改变该 View 的属性而无需在动画里写死 view.xxx() 的方法,这解耦了动画与 View,大大增加了动画代码的可复用性(于是大量针对不同属性的动画可以使用一套动画代码)。
于是...动画?这里有用到动画吗?
接着回溯:
services/core/java/com/android/server/display/DisplayPowerController.java
        mScreenBrightnessRampAnimator = new DualRampAnimator<>(mPowerState,
                DisplayPowerState.SCREEN_BRIGHTNESS_FLOAT,
                DisplayPowerState.SCREEN_SDR_BRIGHTNESS_FLOAT);
诶,这个 FloatProperty 还真的被交给了一个动画诶,但最重要的是我们回到了熟悉的“三大组件”之一的 DisplayPowerController。
这个动画的代码就不想看了,我毫无兴趣,看看顶上的注释吧。
services/core/java/com/android/server/display/RampAnimator.java
/**
 * A custom animator that progressively updates a property value at
 * a given variable rate until it reaches a particular target value.
 * The ramping at the given rate is done in the perceptual space using
 * the HLG transfer functions.
 */
一下子就能够明白它是干什么的:设置亮度值的时候,让屏幕亮度能够平滑的从“当前亮度”过度到“目标亮度”,而避免闪一下的那种跳变,让人看着更舒服些。
so,这个动画何时触发呢?
services/core/java/com/android/server/display/DisplayPowerController.java
    private void animateScreenBrightness(float target, float sdrTarget, float rate) {
        ......
        if (mScreenBrightnessRampAnimator.animateTo(target, sdrTarget, rate)) {
            ......
        }
    }
盯住它,接着网上找。
    private void updatePowerState() {

        ......

        // Apply auto-brightness.
        ......
        if (Float.isNaN(brightnessState)) {
            ......
            if (autoBrightnessEnabled) {
                brightnessState = mAutomaticBrightnessController.getAutomaticScreenBrightness();
                newAutoBrightnessAdjustment =
                        mAutomaticBrightnessController.getAutomaticScreenBrightnessAdjustment();
            }
            ......
        }

        ......

        // Apply manual brightness.
        if (Float.isNaN(brightnessState)) {
            brightnessState = clampScreenBrightness(mCurrentScreenBrightnessSetting);
            ......
        }

            ......

            float animateValue = clampScreenBrightness(brightnessState);

            ......

            if (......) {
                if (......) {
                    animateScreenBrightness(animateValue, sdrAnimateValue,
                            SCREEN_ANIMATION_RATE_MINIMUM);
                } else {
                    ......
                    animateScreenBrightness(animateValue, sdrAnimateValue, rampSpeed);
                }
            }
            ......
    }
进大屎山哩,这个 updatePowerState() 足足有 512 行,经过一大堆删减后,现在应该是一眼就能看出来,这个动画的目标亮度便是自动亮度或手动亮度的值(中间别的因素先忽略了)。我们主要关注自动亮度的部分,可以看到目标亮度最终来自于 AutomaticBrightnessController。
诶,还记得我们上面在对传感器读数的顺藤摸瓜中了解到了 AutomaticBrightnessController 在得到新的屏幕亮度后会通知 DisplayPowerController 进行更新吗?那么这个“通知更新”的过程是怎样的呢?会不会调用到 updatePowerState() 呢?如果会的话一切就都通了。
那么我们继续从上次结束的 AutomaticBrightnessController 调用 DisplayPowerController 更新屏幕亮度开始摸瓜,看看能不能和这次倒着摸到的 updatePowerState() 汇合。
从 DisplayPowerController 继承于 AutomaticBrightnessController.Callbacks 的接口开始:
services/core/java/com/android/server/display/DisplayPowerController.java
    @Override
    public void updateBrightness() {
        sendUpdatePowerState();
    }
private void sendUpdatePowerState() {
synchronized (mLock) {
sendUpdatePowerStateLocked();
}
}
private void sendUpdatePowerStateLocked() {
if (!mStopped && !mPendingUpdatePowerStateLocked) {
mPendingUpdatePowerStateLocked = true;
Message msg = mHandler.obtainMessage(MSG_UPDATE_POWER_STATE);
mHandler.sendMessage(msg);
}
}走进了 handler 里,合理的,对于这种复杂的服务,保障单线程的按序处理还是很有必要的,能够避免很多复杂的 race。
看看 handler 里是怎么处理的吧:
    case MSG_UPDATE_POWER_STATE:
        updatePowerState();
        break;
欸嘿,汇合了。
于是,对于屏幕亮度是如何改变的,我们可以下结论了:AutomaticBrightnessController 在得到新的目标屏幕亮度后,会通知 DisplayPowerController schedule 一次 updatePowerState()。而在 updatePowerState() 中,DisplayPowerController 会从 AutomaticBrightnessController 处读取新的目标屏幕亮度,经过处理后通过优雅的屏幕亮度渐变动画进行应用。
用户如何输入?
这一块内容会牵扯到很多的屎山,于是乎放在这个板块的最后。
从源头看起罢(恼)
亮度条拖动事件
packages/SystemUI/src/com/android/systemui/settings/brightness/BrightnessController.java
public class BrightnessController implements ToggleSlider.Listener ...... {
    ......
    @Override
    public void onChanged(boolean tracking, int value, boolean stopTracking) {
        ......
        setBrightness(valFloat);
        if (!tracking) {
            AsyncTask.execute(new Runnable() {
                    public void run() {
                        mDisplayManager.setBrightness(mDisplayId, valFloat);
                    }
                });
        }
    }
    ......
    private void setBrightness(float brightness) {
        mDisplayManager.setTemporaryBrightness(mDisplayId, brightness);
    }
    ......
}
于是进入了系统 api:BrightnessController -> DisplayManager -> DisplayManagerGlobal
这两层都只是简单包装,代码直接省略。
最后从 DisplayManagerGlobal 离开系统 api ,通过 binder call 进入 system server。
这里对应的服务是 DisplayManagerService:
services/core/java/com/android/server/display/DisplayManagerService.java
    @Override // Binder call
    public void setTemporaryBrightness(int displayId, float brightness) {
        ......
                mDisplayPowerControllers.get(displayId)
                        .setTemporaryBrightness(brightness);
        ......
    }

    @Override // Binder call
    public void setBrightness(int displayId, float brightness) {
       ......
                DisplayPowerController dpc = mDisplayPowerControllers.get(displayId);
                if (dpc != null) {
                    dpc.putScreenBrightnessSetting(brightness);
                }
       ......
    }
于是兜了一圈我们回来了,熟悉的 DisplayPowerController。
现在我们知道了拖动亮度条时发生了什么:在亮度条拖动时,会时刻调用 DisplayPowerController 的 setTemporaryBrightness() 方法设置临时亮度,在亮度条结束拖动时调用其 putScreenBrightnessSetting() 设置真正的亮度。于是当你拖动亮度条看着屏幕亮度跟随手指变化时,其实这个亮度值并没有被应用进去,只是个临时量,松手的那一刻才真正的写入系统(这很合理)。
所以接下来我们有两条路径可以研究,一条是临时亮度的设置,另一条则是真正亮度的应用,那就先从简单的开始吧。
临时亮度的设置
services/core/java/com/android/server/display/DisplayPowerController.java
    public void setTemporaryBrightness(float brightness) {
        Message msg = mHandler.obtainMessage(MSG_SET_TEMPORARY_BRIGHTNESS,
                Float.floatToIntBits(brightness), 0 /*unused*/);
        msg.sendToTarget();
    }
这个东西很简单捏,schedule 了一条 handler message 然后发了出去,去看看这条消息是怎么被处理的:
    case MSG_SET_TEMPORARY_BRIGHTNESS:
        // TODO: Should we have a a timeout for the temporary brightness?
        mTemporaryScreenBrightness = Float.intBitsToFloat(msg.arg1);
        updatePowerState();
        break;
仅仅只是更新了一个变量,然后就去调用我们熟悉的 updatePowerState() 了,还记得在这个方法里面,会调用一个动画来更新屏幕亮度吧?
不妨结合应用自动亮度和手动亮度的代码,看看临时亮度和它们是什么关系:
    private void updatePowerState() {
        ......
        if (isValidBrightnessValue(mTemporaryScreenBrightness)) {
            brightnessState = mTemporaryScreenBrightness;
            mAppliedTemporaryBrightness = true;
            mBrightnessReasonTemp.setReason(BrightnessReason.REASON_TEMPORARY);
        }

        ......

        // Apply auto-brightness.
        ......
        if (Float.isNaN(brightnessState)) {
            ......
            if (autoBrightnessEnabled) {
                brightnessState = mAutomaticBrightnessController.getAutomaticScreenBrightness();
                newAutoBrightnessAdjustment =
                        mAutomaticBrightnessController.getAutomaticScreenBrightnessAdjustment();
            }
            ......
        }

        ......

        // Apply manual brightness.
        if (Float.isNaN(brightnessState)) {
            brightnessState = clampScreenBrightness(mCurrentScreenBrightnessSetting);
            ......
        }

            ......

            float animateValue = clampScreenBrightness(brightnessState);

            ......

            if (......) {
                if (......) {
                    animateScreenBrightness(animateValue, sdrAnimateValue,
                            SCREEN_ANIMATION_RATE_MINIMUM);
                } else {
                    ......
                    animateScreenBrightness(animateValue, sdrAnimateValue, rampSpeed);
                }
            }
            ......
    }
可以看到,如果临时亮度存在,则 brightnessState 会被最先赋值,于是自动亮度和手动亮度的值都会被忽略,最终,临时亮度得到了应用。也就是说,临时亮度的优先级是高于自动和手动亮度的,合理的。
真正亮度的设置
这个过程就复杂了,于是放在了这个板块最后的最后,得在屎山里搅一会儿。
从 DisplayPowerController 被调用的函数开始吧:
services/core/java/com/android/server/display/DisplayPowerController.java
    void putScreenBrightnessSetting(float brightnessValue) {
        putScreenBrightnessSetting(brightnessValue, false);
    }

    private void putScreenBrightnessSetting(float brightnessValue, boolean updateCurrent) {
        if (!isValidBrightnessValue(brightnessValue)) {
            return;
        }
        if (updateCurrent) {
            setCurrentScreenBrightness(brightnessValue);
        }
        mBrightnessSetting.setBrightness(brightnessValue);
    }
看样子,它钻进了另一个东西里面—— BrightnessSetting:
services/core/java/com/android/server/display/BrightnessSetting.java
/**
 * Saves brightness to a persistent data store, enabling each logical display to have its own
 * brightness.
 */
public class BrightnessSetting {
    ......

    public float getBrightness() {
        ......
    }

    ......
    public void registerListener(BrightnessSettingListener l) {
        ......
    }

    ......
    public void unregisterListener(BrightnessSettingListener l) {
        ......
    }

    void setBrightness(float brightness) {
        ......
    }

    /**
     * Listener for changes to system brightness.
     */
    public interface BrightnessSettingListener {

        /**
         * Notify that the brightness has changed.
         */
        void onBrightnessChanged(float brightness);
    }
}
幸运的是这个类的公开方法还挺少的,而且甚至不用看代码只要看看注释和方法名称就能把它的功能猜出来:它负责两件事,一是亮度数据的永久存储,二是在新的亮度数据被存储时通知注册的所有 BrightnessSettingListener。
于是,我们可以在 DisplayPowerController 中找到这个注册的 Listener:
services/core/java/com/android/server/display/DisplayPowerController.java
    mBrightnessSettingListener = brightnessValue -> {
        Message msg = mHandler.obtainMessage(MSG_UPDATE_BRIGHTNESS, brightnessValue);
        mHandler.sendMessage(msg);
    };
functional interface 结合 lambda 表达式,优雅!
在这里,它把接下来的工作交给了 handler ,跟过去看看:
    case MSG_UPDATE_BRIGHTNESS:
        if (mStopped) {
            return;
        }
        handleSettingsChange(false /*userSwitch*/);
        break;
最终起作用的是 handleSettingsChange():
    private void handleSettingsChange(boolean userSwitch) {
        mPendingScreenBrightnessSetting = getScreenBrightnessSetting();
        if (userSwitch) {
            ......
        }
        ......
        sendUpdatePowerState();
    }
先来看看 getScreenBrightnessSetting():
    float getScreenBrightnessSetting() {
        float brightness = mBrightnessSetting.getBrightness();
        if (Float.isNaN(brightness)) {
            brightness = mScreenBrightnessDefault;
        }
        return clampAbsoluteBrightness(brightness);
    }
它做了一件事:把刚刚存进 BrightnessSetting 的亮度数据给读出来(诶,你都把亮度数据给塞进 handler message 里了,直接在那里取出来就好了,重新读可真是多此一举👀)。
再看看 sendUpdatePowerState()。
不对,这个根本就不用看了,上面 AutomaticBrightnessController 通知 DisplayPowerController 更新屏幕亮度时不就是走的这个函数么?这个函数最终会在 handler 线程上 schedule 一次屎山的 updatePowerState()。
所以,在此,可以对用户输入进行一个小结:
手指松开时,亮度值先被塞给 BrightnessSetting 存储,然后经过一系列的调用被 updatePowerState() 给应用了。
接下来看看应用的过程,这也是最为屎的一部分:
我们已经知道了,亮度值被保存在全局变量 mPendingScreenBrightnessSetting 中。
mPendingScreenBrightnessSetting = getScreenBrightnessSetting();回到屎山 updatePowerState() 看看:
    private void updatePowerState() {

        ......

        final boolean userSetBrightnessChanged = updateUserSetScreenBrightness();

        ......

        // Configure auto-brightness.
        if (mAutomaticBrightnessController != null) {
            ......
            mAutomaticBrightnessController.configure(......
                    mLastUserSetScreenBrightness,
                    ......);
        }

        ......

        // Apply auto-brightness.
        ......
        if (Float.isNaN(brightnessState)) {
            ......
            if (autoBrightnessEnabled) {
                brightnessState = mAutomaticBrightnessController.getAutomaticScreenBrightness();
                newAutoBrightnessAdjustment =
                        mAutomaticBrightnessController.getAutomaticScreenBrightnessAdjustment();
            }
            ......
        }

        ......

        // Apply manual brightness.
        if (Float.isNaN(brightnessState)) {
            brightnessState = clampScreenBrightness(mCurrentScreenBrightnessSetting);
            ......
        }
    }
这坨屎还是很有分量的,可以看到在这里压根没有用到 mPendingScreenBrightnessSetting,那新的亮度是怎么被传进去的?
答案是:在上面调用的 updateUserSetScreenBrightness() 把亮度放进了另外两个全局变量里:
    private void setCurrentScreenBrightness(float brightnessValue) {
        if (brightnessValue != mCurrentScreenBrightnessSetting) {
            mCurrentScreenBrightnessSetting = brightnessValue;
            ......
        }
    }

    // We want to return true if the user has set the screen brightness.
    // If they have just turned RBC on (and therefore added that interaction to the curve),
    // or changed the brightness another way, then we should return true.
    private boolean updateUserSetScreenBrightness() {
        ......
        setCurrentScreenBrightness(mPendingScreenBrightnessSetting);
        mLastUserSetScreenBrightness = mPendingScreenBrightnessSetting;
        ......
    }
于是乎,由结束拖动亮度条得到的亮度数值,被放进了全局变量 mLastUserSetScreenBrightness 和 mCurrentScreenBrightnessSetting 里,分别被用来“配置”自动亮度和作为手动亮度值。
那到了这里,我们已经彻底明白了手指松开亮度条时得到的“真正亮度”是如何被应用的:
手指松开时,亮度值先被塞给 BrightnessSetting 存储,然后经过一系列的传递和转储,最终在 updatePowerState() 中被使用;对于手动亮度,该值会被直接使用作为手动亮度值;对于自动亮度,该值会被传递给 AutomaticBrightnessController 用于“配置”自动亮度,然后应用的是从 AutomaticBrightnessController 中读取到的新自动亮度值,而非直接使用传入的值。
接下来开始骂屎山:这他妈的写的是什么玩意儿,整个 DisplayPowerController 的有效业务逻辑基本全部堆在一个方法里,一个方法写好几百行,参数还全 tmd 用全局变量瞎 jb 传递,谁知道这坨全局变量是干嘛的啊,代码可读性为零。看了一下,这套东西的整体框架还是十年前的,安卓 4.2 时代的东西了,一直没有大改,一直靠往上堆东西来支持新的特性。
小结
到了这里,我们已经完成了整体框架上的分析,了解了与自动亮度相关的 “三大组件” 和它们的职责与配合方式。
简单概括一下:DisplayPowerController 直接持有另外两大组件,并对它们进行配置;BrightnessMappingStrategy 负责将环境亮度转换为屏幕亮度,是自动亮度的核心;AutomaticBrightnessController 负责传感器采样,数据预处理,消抖等等,是自动亮度的中间桥梁,连接着 BrightnessMappingStrategy 与 DisplayPowerController;DisplayPowerController 则负责综合考虑各种设置与功能,给出最终的屏幕亮度值。
自动亮度策略
这一块的内容主要聚焦于:究竟是怎么把环境亮度映射到屏幕亮度的、overlay 中配置的那几张长长的关键表是如何起作用的、拖动亮度条是怎么影响自动亮度的“配置”的。
聚焦的组件主要是:BrightnessMappingStrategy 与 AutomaticBrightnessController。
基础铺垫
一些光学概念
在正式开始之前,我想铺垫一些光学知识还是有必要的,这可以避免问出:“如何把勒克斯转为尼特?”这样的无意义问题。
以下内容不科学不严谨,仅仅只用于帮助理解。
首先,我觉得最先要定义的是“光通量”,其单位是“流明”。这个概念看起来很复杂但实际上非常简单:你可以将它类比到电磁发射器的功率,嗯说白了就是每秒发射或接收了多少光(多少能量的电磁波)。当然,这里没法把光量和电磁波能量进行直接转换,毕竟光量是根据人类眼睛的感受能力定义的,仅仅只是一个类比。
光源可以向四面八方发射光线,假如我们把光源周围遮住一部分,它每秒发射的总光量就下降了,这是显然的。但是,光源的强度减弱了吗?我想是没有的。
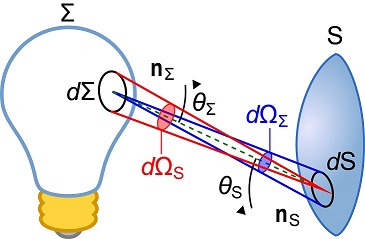
于是,我们需要另一个概念来定义光源的强度,那就是“光强”,其单位是“坎德拉”。“光强”是光源每“立体角”发出的“光通量” (光强 = 光通量 / 立体角),这里的“立体角”可以简单理解为“平面角”的推广(相当于把弧度上升到了三维空间),可以简单理解为三维空间中的一度(并不严谨)。
“光强”描述的是光源在单位角度区间内的“光通量”,但是在现实中我们往往无法接收这样一个区间内的所有光,因为当离得很远的时候这个角度张成的空间会变得超级大。
于是,我们还需要定义一个对现实更有参考意义的概念,来让我们评估接收时光的强度。
这个东西便是“照度”,单位是“勒克斯”,是不是很熟悉,这就是光线传感器读到的数值。“照度”的定义是:单位面积的光通量(照度 = 光通量 / 接收面积)。
如何理解这个东西呢?上面也说了,光通量可以理解为发射功率,那么这个“照度”实际上就是和“太阳常数”差不多的东西,描述单位面积上接收到的功率(光量)。
最后一个,好像也是最难弄明白的是“亮度”,单位是“尼特”,没错就是厂家经常吹的什么屏幕峰值亮度高达 xxx nit。
亮度的定义是:单位面积的光强。
按照 维基百科 上的定义,这里的单位面积应该是指光源的面积,也就是说写成公式应该是:亮度 = 光强 / 发光面积。
乍一看这好像很难理解,但是仔细想想确实没啥毛病:光源可以有大有小,一个超级大的光源和一个很小的光源如果具有相同的光强和发射角度,也就是发射着相同功率的光,那么谁会看着更亮呢?形象一点,假如太阳和一个弹珠发射着相同功率的光...谁更亮不用说了吧。
需要注意的是,亮度是针对光源的,属于光源(或者反射面)的固有属性,它是不随观察距离变化的。
中文版的维基上有这样一句话,我认为是存在大问题的:简而言之,当任两个物体表面在照相时被拍摄出的最终结果是一样亮、或被眼睛看起来两个表面一样亮,它们就是亮度相同。
它忽略了观察者的距离这一重要因素。人眼所感受到的亮度归根结底是照度,而照度是会随着距离呈平方关系衰减的。还有一种理解方式:在上方的公式中,亮度是使用二阶偏导进行定义的,微元化意味着每一根光线的亮度都是恒定的,不会随距离衰减。但是距离远了,意味着人眼所接收到的光线数量变少了,自然会觉得变暗了。
所以,为什么光线传感器不能用尼特作为单位呢?因为它根本就不是在监测一个光源或者一个反射面啊,传感器得到的数据是千千万万个反射面发出的光线汇聚在一起的结果,而亮度的定义是针对光源或者单一反射面的,因此在这里使用尼特就显得不合实际。
有了这些铺垫,相信对接下来的照度——亮度映射表会有更好的理解。
Gamma 校正
之所以这里会牵扯到 gamma 校正,是因为自动亮度中的一个小算法牵扯到了它。这个小算法不能说和 gamma 校正作用相同,但是思想是可以相互借鉴的。
关于它,网上有很多的江湖传说,我这里就只讲一个自己理解的超简化版本。
众所周知,相机在记录图像的时候,是在收集传感器的电信号罢。
这些电信号是线性的,即拍摄的画面亮度越大,记录的电信号也越大,两者之间相差一个系数。
把这些照片传到电脑上,如果想要把拍到的照片显示出来,那么我们需要把刚刚记录的电信号发送给电脑屏幕。
但是,电脑屏幕的物理特性决定了它的显示不是线性的,即所加的电信号和显示的亮度之间并不是只差一个系数,它们往往呈幂函数关系:显示器亮度 = 电信号 ^ k。
于是,想要让我们拍摄的照片,在被人眼看到时能将亮度线性的还原,我们需要为我们的照相机也配一个幂次 电信号 = 拍到的亮度 ^ (1 / k)。
嵌套这两个等式,我们能够得到从 拍到的亮度 到 显示器亮度 的转换关系,我们配上的幂次抵消了显示器的物理特性,从而使得这一关系重新变得线性,这个过程便被称为“ gamma 校正”。
简单来说, gamma 校正就是进行了如下变换:新曲线 = 老曲线 ^ gamma
gamma 校正的核心在于通过配一个幂次来改变原有曲线,从而让它能够去符合某些想要的特性。比如在这里,我们通过配一个幂次来使它变得线性。但是,想要的特性也可以是:我想要让这个曲线通过某一特定的点,并不一定要是线性的,只要过那个点就行。这种要求靠 gamma 校正也是可以实现的,效果还挺优雅的,而这正是它在“自动亮度拟合用户偏好”中的应用,接下来会细说。
我们只考虑 gamma 大于 0 的情况。
归一化
其实不止是在这里,归一化在别的一些地方比如机器学习,也有着广泛的应用。
之所以要在这里介绍归一化,得从 gamma 校正的特点说起:
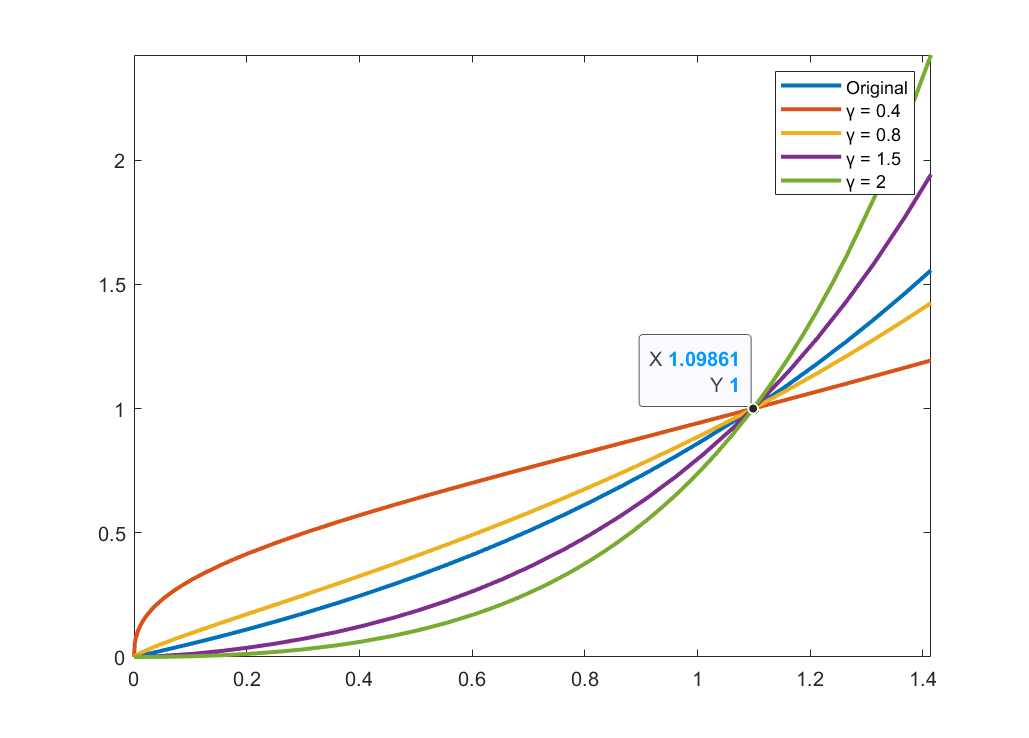
看到了吗,对原曲线 (Original) 应用不同 gamma (γ) 值的校正,其在原曲线值域小于 1 的区间和大于 1 的区间上呈现出了完全不同的特性:
- 在值域小于 1 的区间上应用小于 1 的 gamma 值,曲线会被往上拽。
- 在值域小于 1 的区间上应用大于 1 的 gamma 值,曲线会被往下拽。
- 在值域大于 1 的区间上应用小于 1 的 gamma 值,曲线会被往下拽。
- 在值域大于 1 的区间上应用大于 1 的 gamma 值,曲线会被往上拽。
- 对值为 1 的点,无论怎么应用校正都无济于事!
这种特性好吗?一点也不好!以值域 1 为界呈现完全相反的特性,实在是太离谱了,无法接受!
于是,在使用 gamma 校正之前,我们会对值域进行一个归一化,把它从原来的任意区间映射到 0 到 1 之间 (也就是取图中交点左边的部分),这样 gamma 校正带来的曲线移动方向就定下来了。
那么,它是如何进行的?其实非常简单。
我们假设原来的数字分布在 0 到 255 之间,想要进行这个归一化,只需要把原来的数字除以 255 即可 (新值 = 老值 / 老区间上限)。
基本工作机制
先从我们写在 overlay 中的那几张长长的表看起。
这块东西甚至不需要看代码,看看注释足以。
照度的输入
    <!-- Array of light sensor lux values to define our levels for auto backlight brightness support.
         The N entries of this array define N + 1 control points as follows:
         (1-based arrays)

         Point 1:            (0, value[1]):             lux <= 0
         Point 2:     (level[1], value[2]):  0        < lux <= level[1]
         Point 3:     (level[2], value[3]):  level[2] < lux <= level[3]
         ...
         Point N+1: (level[N], value[N+1]):  level[N] < lux

         The control points must be strictly increasing.  Each control point
         corresponds to an entry in the brightness backlight values arrays.
         For example, if lux == level[1] (first element of the levels array)
         then the brightness will be determined by value[2] (second element
         of the brightness values array).

         Spline interpolation is used to determine the auto-brightness
         backlight values for lux levels between these control points.

         Must be overridden in platform specific overlays -->
    <integer-array name="config_autoBrightnessLevels">
    </integer-array>
首先,有一张表是用于描述传感器输入的照度值的。若这张表中有 N 组数据,则代表了 N + 1 个照度等级。为什么会多出来 1 呢?因为这张表自带了一个照度为 0 的等级,你可以理解为它会在你定义的第一个等级之前自动加上一个照度为 0 的等级。
这张表中的每一个照度等级,都将被映射到一个输出等级(包括自动补上去的 0 照度),这种映射将会是一一对应的,即:
- 自动加的 0 照度会被映射到输出表的第一个等级
- 你定义的第一个照度会被映射到输出表的第二个等级
- 依此类推...
那么,假如输入的照度值在两个等级之间咋办呢?该映射到哪个输出呢?答案是会使用“ 样条插值 ”。因此,想要让插值的结果保持合理,输入和输出表具有单调递增性是十分重要的。事实上,自动亮度映射牵扯到的几张表,都应该是单调递增的。
接下来,来看看输出等级是如何定义的。
方式一:直接背光输出
    <!-- Array of output values for LCD backlight corresponding to the lux values
         in the config_autoBrightnessLevels array.  This array should have size one greater
         than the size of the config_autoBrightnessLevels array.
         The brightness values must be between 0 and 255 and be non-decreasing.
         This must be overridden in platform specific overlays -->
    <integer-array name="config_autoBrightnessLcdBacklightValues">
    </integer-array>
这非常好理解,每一个输入直接被映射为一个背光等级参数,而这个参数可以直接被作为亮度参数进行应用。
典型的参数范围是 0 到 255,0 代表屏幕完全熄灭,255 则代表亮度拉满。
这种映射方式非常方便,易于理解但不易于移植,因为不同的屏幕具有不同的发光特性,相同的背光等级参数在不同的屏幕上效果可能是千差万别的。假如想要在一台全新的设备上调出一条完美的自动亮度曲线,使用这种方式可能需要大量的调试,以找出那个合适的亮度等级。
那么,有没有一种方式能够提高亮度映射的可移植性,减少调参工作量呢?
方式二:间接背光输出
    <!-- Array of desired screen brightness in nits corresponding to the lux values
         in the config_autoBrightnessLevels array. As with config_screenBrightnessMinimumNits and
         config_screenBrightnessMaximumNits, the display brightness is defined as the measured
         brightness of an all-white image.

         If this is defined then:
            - config_autoBrightnessLcdBacklightValues should not be defined
            - config_screenBrightnessNits must be defined
            - config_screenBrightnessBacklight must be defined

         This array should have size one greater than the size of the config_autoBrightnessLevels
         array. The brightness values must be non-negative and non-decreasing. This must be
         overridden in platform specific overlays -->
    <array name="config_autoBrightnessDisplayValuesNits">
    </array>
在这种方式下,输出表变为了屏幕亮度,是以尼特为单位的亮度。
诶,不对啊,给一个亮度值我该怎么知道这个亮度对应的屏幕背光等级?我不知道背光等级我该怎么告诉硬件该调多亮?
别急,还有两个表:
    <!-- An array describing the screen's backlight values corresponding to the brightness
         values in the config_screenBrightnessNits array.

         This array should be equal in size to config_screenBrightnessBacklight. -->
    <integer-array name="config_screenBrightnessBacklight">
    </integer-array>

    <!-- An array of floats describing the screen brightness in nits corresponding to the backlight
         values in the config_screenBrightnessBacklight array.  On OLED displays these  values
         should be measured with an all white image while the display is in the fully on state.
         Note that this value should *not* reflect the maximum brightness value for any high
         brightness modes but only the maximum brightness value obtainable in a sustainable manner.

         This array should be equal in size to config_screenBrightnessBacklight -->
    <array name="config_screenBrightnessNits">
</array>这两个表描述了屏幕的物理特性——在某个背光等级下屏幕有多亮。config_screenBrightnessBacklight 与 config_screenBrightnessNits 一一对应,前者描述屏幕背光等级,后者描述该等级下的亮度。
于是,在从输出表拿到所需屏幕亮度后,只需将该亮度值放进 config_screenBrightnessNits 表进行匹配,即可从 config_screenBrightnessBacklight 表获得对应的背光等级,于是便可以进行调整了。当然,处于两个等级之间的值,也会通过插值进行计算。
这种方式大大提高了亮度曲线的可移植性,不同的机型完全可以使用相同的 config_autoBrightnessDisplayValuesNits 表,而只需要对屏幕硬件进行测量得到描述屏幕物理特性的两张表即可。而测量物理特性是机器可以干的事情,人只需要为每一个环境光照度选择一个屏幕亮度即可,非常方便。
自动亮度曲线
由于这个东西在接下来的分析中会出现,因此在这里先铺垫一下。
以方式二为例。
我们可以以照度为横轴,以屏幕亮度 (nit) 为纵轴,绘制一条曲线,这条曲线描述了屏幕亮度随环境光的变化情况: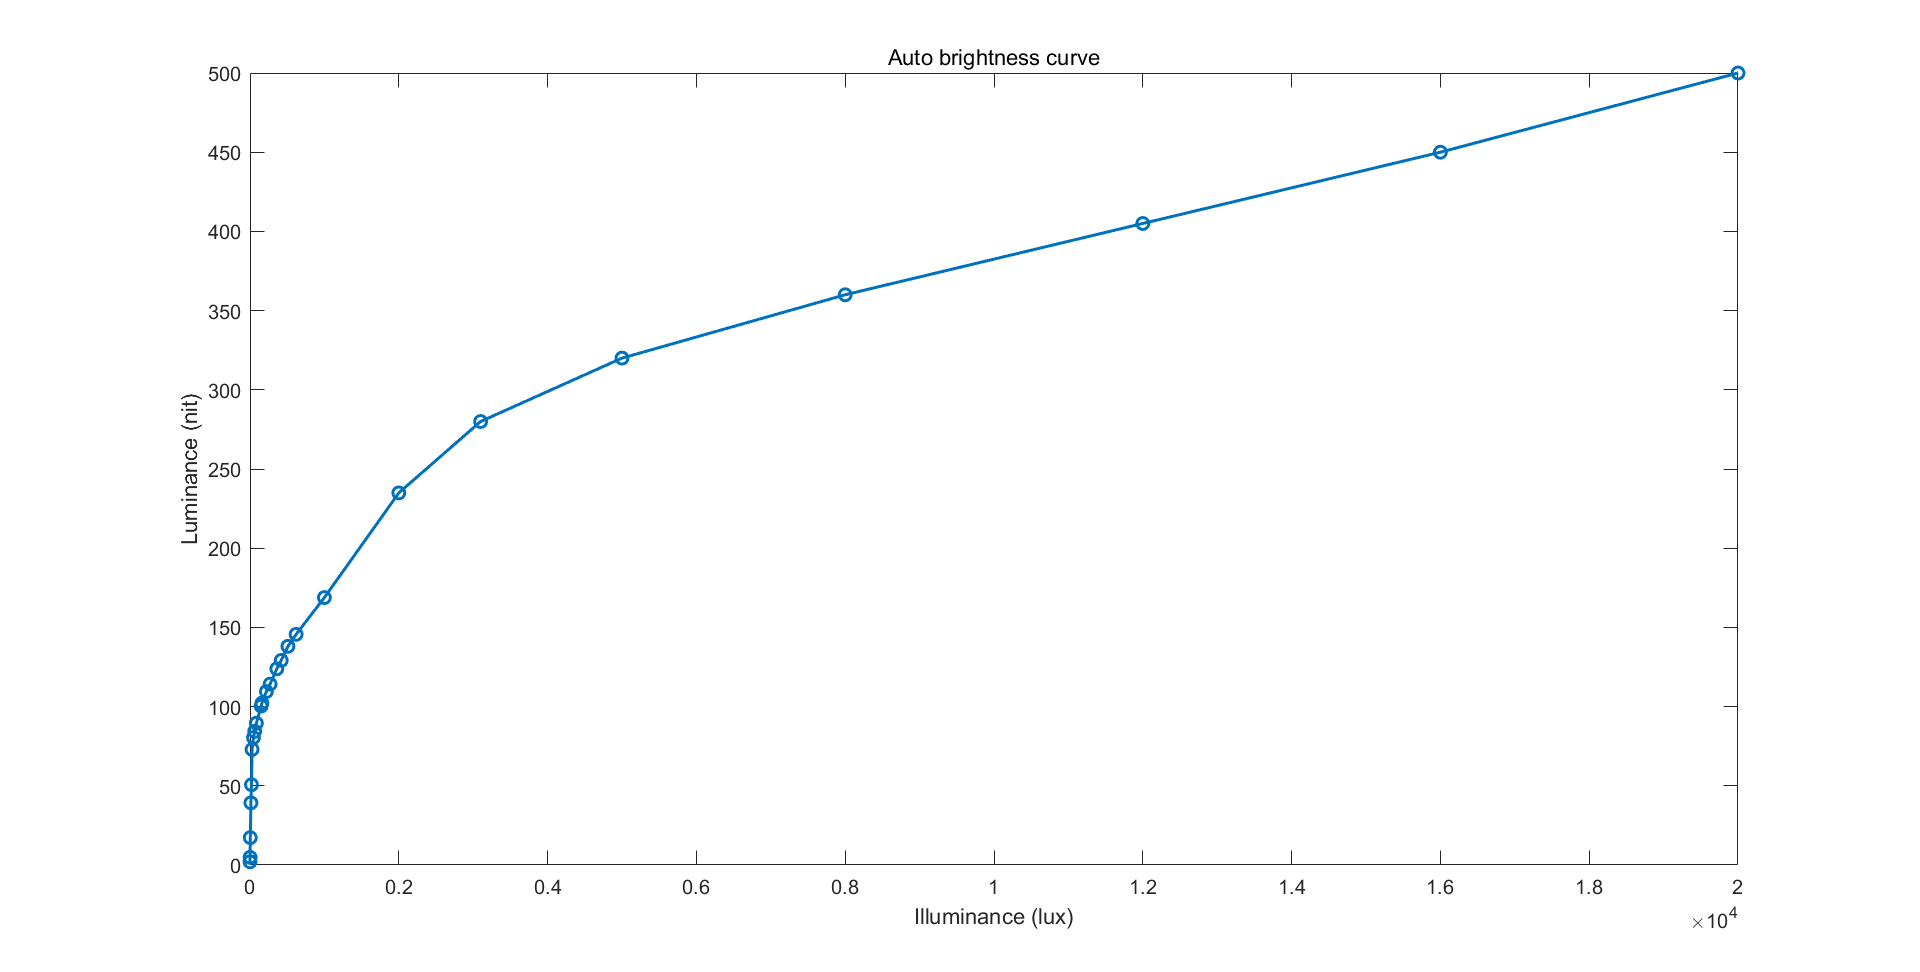
我们还可以利用描述屏幕物理特性的两张表,将归一化背光等级作为横轴,屏幕亮度作为纵轴,绘制屏幕特性曲线: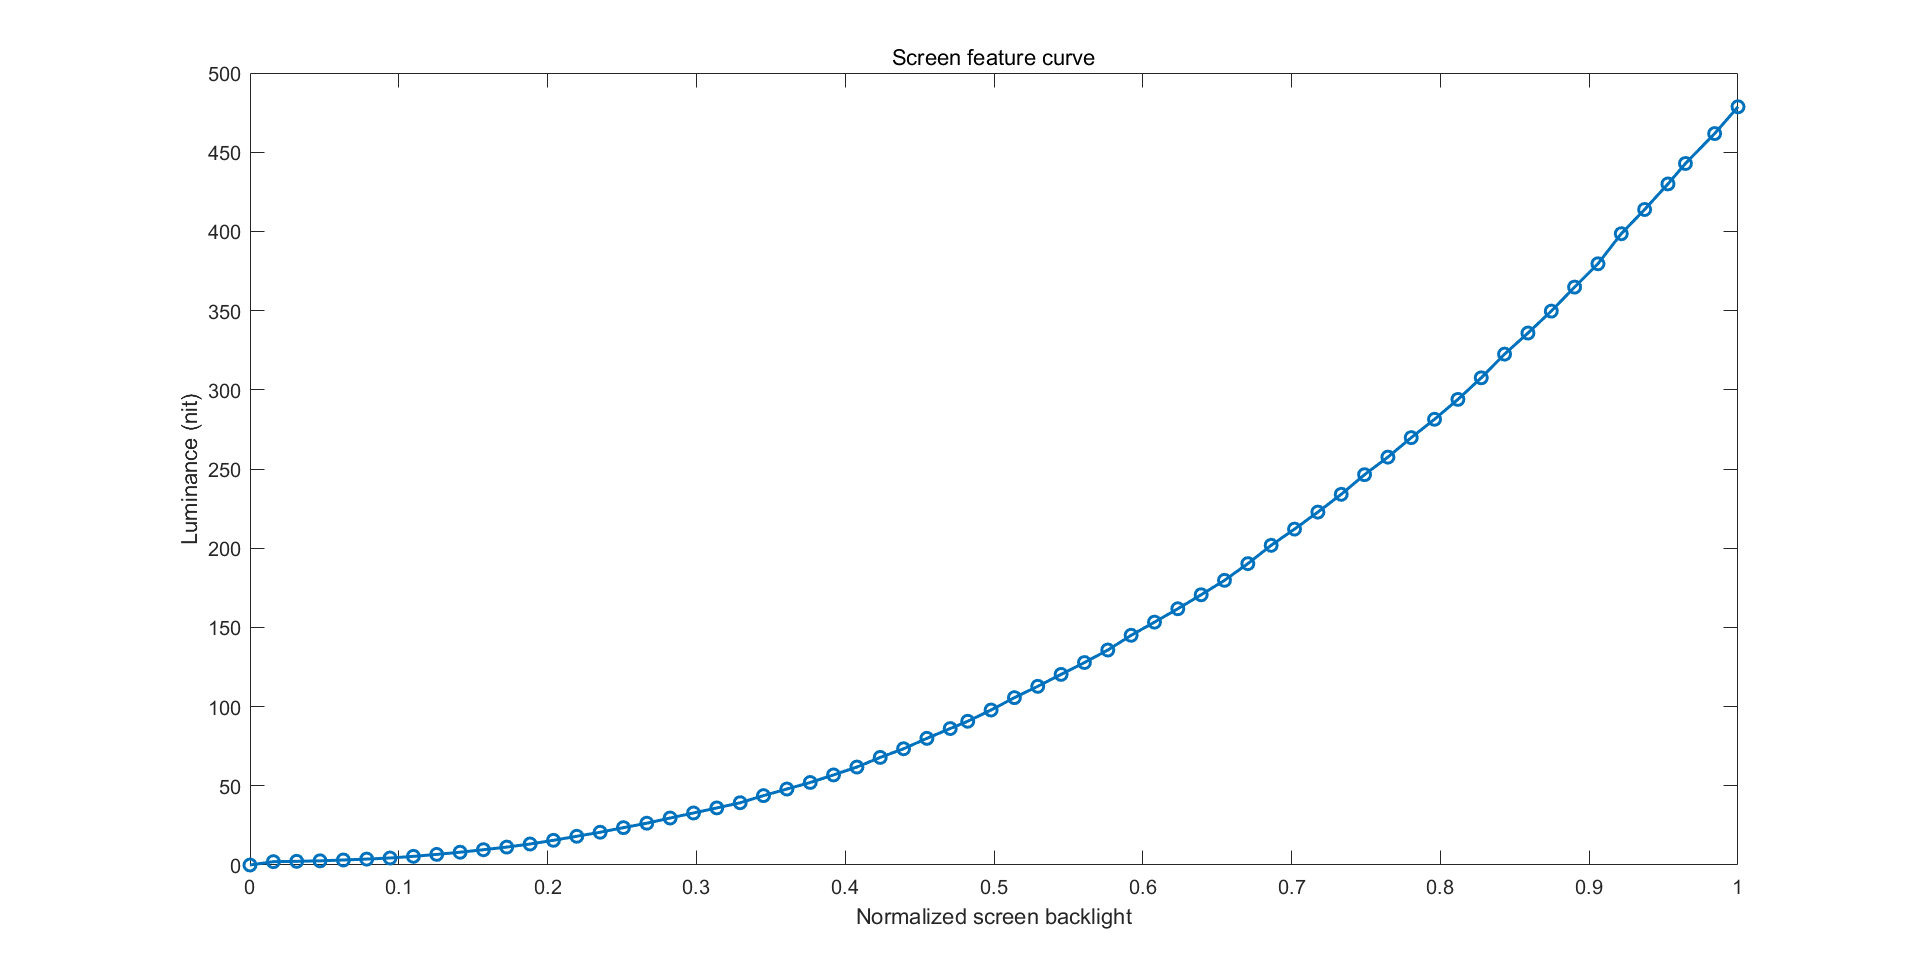
结合上面两条曲线,我们也能够得到以环境光为输入,以归一化背光等级为输出的曲线,正是这条曲线描绘了自动亮度策略的总输入和总输出: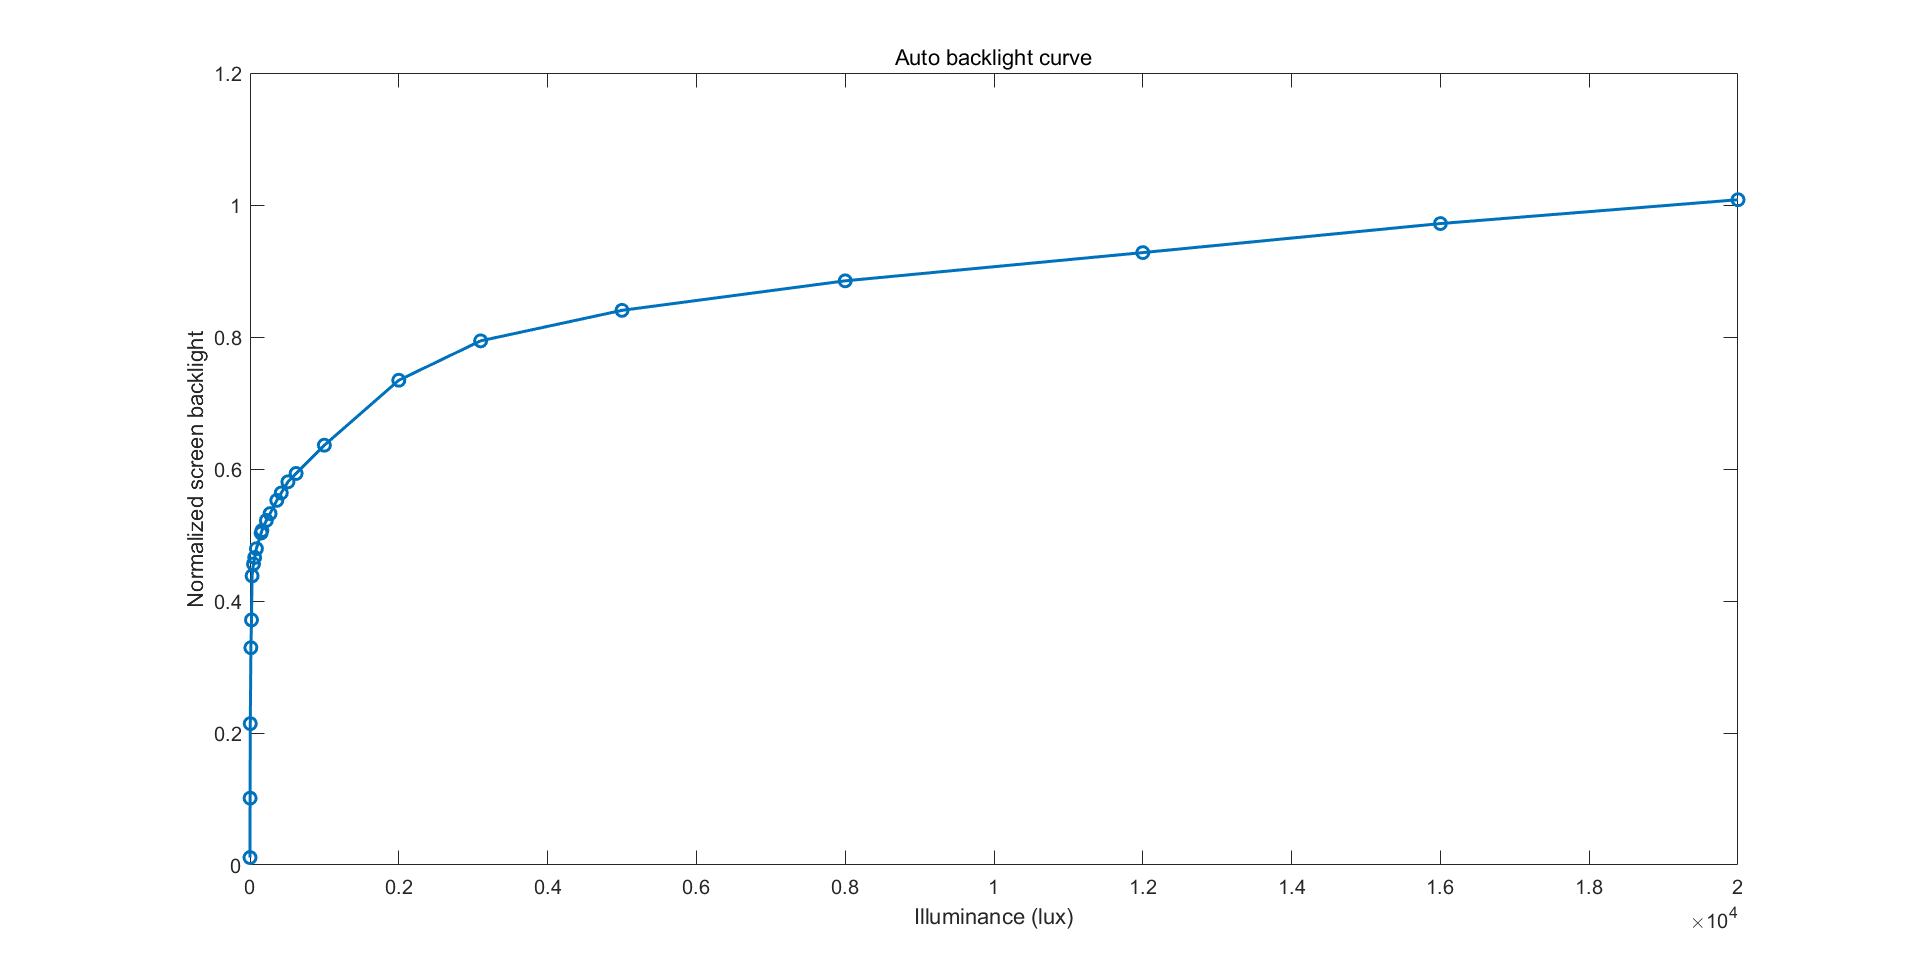
对于方式一来说,我们能够直接得到第三条曲线,而无需通过计算进行融合。
无论如何,时刻记住:
曲线仅仅只是一组映射表的可视化罢了。
曲线可以很优雅的反应输入与输出之间的关系,以及凹凸性、增速等复杂的关系,可以为我们的理解和调整带来很大的方便。
上图的曲线,是利用 LineageOS 从一加官方 overlay 反编译得到的数据绘制而成的。
代码上的实现
这块内容就没必要细看了,上面的注释已经写的很清楚了,我们只要看个框架,把东西对应上就够了。
“亮度映射策略” 这整个东西,对应于三大组件中的 BrightnessMappingStrategy ,这是一个抽象类,它包含了两个静态内部类负责对抽象的东西进行实现。
第一个实现为 SimpleMappingStrategy ,它负责实现上面提及的方式一,从照度对背光等级进行直接映射。第二个实现为 PhysicalMappingStrategy ,它负责实现方式二,先进行照度到亮度的映射,再从亮度映射到背光等级。
那么,是如何选择要使用哪一种方式的呢?
    @Nullable
    public static BrightnessMappingStrategy create(Resources resources,
            DisplayDeviceConfig displayDeviceConfig) {

        // Display independent values
        float[] luxLevels = getLuxLevels(resources.getIntArray(
                com.android.internal.R.array.config_autoBrightnessLevels));
        int[] brightnessLevelsBacklight = resources.getIntArray(
                com.android.internal.R.array.config_autoBrightnessLcdBacklightValues);
        float[] brightnessLevelsNits = getFloatArray(resources.obtainTypedArray(
                com.android.internal.R.array.config_autoBrightnessDisplayValuesNits));
        float autoBrightnessAdjustmentMaxGamma = resources.getFraction(
                com.android.internal.R.fraction.config_autoBrightnessAdjustmentMaxGamma,
                1, 1);
        long shortTermModelTimeout = resources.getInteger(
                com.android.internal.R.integer.config_autoBrightnessShortTermModelTimeout);

        // Display dependent values - used for physical mapping strategy nits -> brightness
        final float[] nitsRange = displayDeviceConfig.getNits();
        final float[] brightnessRange = displayDeviceConfig.getBrightness();

        if (isValidMapping(nitsRange, brightnessRange)
                && isValidMapping(luxLevels, brightnessLevelsNits)) {

            BrightnessConfiguration.Builder builder = new BrightnessConfiguration.Builder(
                    luxLevels, brightnessLevelsNits);
            builder.setShortTermModelTimeoutMillis(shortTermModelTimeout);
            builder.setShortTermModelLowerLuxMultiplier(SHORT_TERM_MODEL_THRESHOLD_RATIO);
            builder.setShortTermModelUpperLuxMultiplier(SHORT_TERM_MODEL_THRESHOLD_RATIO);
            return new PhysicalMappingStrategy(builder.build(), nitsRange, brightnessRange,
                    autoBrightnessAdjustmentMaxGamma);
        } else if (isValidMapping(luxLevels, brightnessLevelsBacklight)) {
            return new SimpleMappingStrategy(luxLevels, brightnessLevelsBacklight,
                    autoBrightnessAdjustmentMaxGamma, shortTermModelTimeout);
        } else {
            return null;
        }
    }
很简单,如果方式二有效( overlay 都正确定义了),则优先使用方式二,否则尝试方式一。
屏幕的物理属性是从 DisplayDeviceConfig 直接读取的,这在上面的 “配置被谁读取?” 板块中有所介绍。
那么 BrightnessMappingStrategy 都有哪些重要的公开方法呢?这有助于我们对这个类产生一个更全面的认识。
public abstract class BrightnessMappingStrategy {
    ......
    public static BrightnessMappingStrategy create(Resources resources,
            DisplayDeviceConfig displayDeviceConfig) {
        ......
    }
    ......
    public abstract boolean setBrightnessConfiguration(@Nullable BrightnessConfiguration config);
    ......
    public abstract BrightnessConfiguration getBrightnessConfiguration();
    ......
    public abstract float getBrightness(float lux, String packageName,
            @ApplicationInfo.Category int category);
    ......
    public abstract float getAutoBrightnessAdjustment();
    ......
    public abstract boolean setAutoBrightnessAdjustment(float adjustment);
    ......
    public abstract void addUserDataPoint(float lux, float brightness);
    ......
    public abstract void clearUserDataPoints();
    ......
}
我所认为的重要公开方法总共分为五类:
- 实现类的创建方法。
- 亮度配置的读写方法。
- 从照度获取背光值的方法。(这个在上面的框架分析中已经牵扯到了,接下来就不再介绍)
- “亮度调整值”的读写方法。
- “用户数据点”的创建与清除方法。
没介绍到的方法都会在接下来有所阐述,此处仅供热身。
小结
通过这一块内容,我们了解了自动亮度的基本工作机制——即从照度到屏幕背光值的映射是如何进行的,这也是自动亮度工作原理中最重要的内容。所以,现在,假如你觉得自动亮度不舒服,你一定会动手调一调 overlay 中的几张映射表了吧?
“学习”用户偏好
在上面的框架分析中,我们已经了解到了自动亮度的正向传播方式,即环境光是如何被映射为屏幕背光值的。
但是,我们并不知道用户行为是如何反向传播给自动亮度策略的,也就是,拉动亮度条究竟对自动亮度策略产生了什么影响。
代码跟踪
在上面,我们已知,用户停止拖动亮度条那一瞬间的指定亮度,会被交给 AutomaticBrightnessController 的 configure() 方法,那么接下来又发生了什么呢?继续追着看看。
services/core/java/com/android/server/display/AutomaticBrightnessController.java
    public void configure(......
            float brightness, boolean userChangedBrightness, ......) {
        ......
        if (userChangedBrightness && ......) {
            ......
            changed |= setScreenBrightnessByUser(brightness);
        }
        ......
    }
继续:
    private boolean setScreenBrightnessByUser(float brightness) {
        if (!mAmbientLuxValid) {
            // If we don't have a valid ambient lux then we don't have a valid brightness anyway,
            // and we can't use this data to add a new control point to the short-term model.
            return false;
        }
        mBrightnessMapper.addUserDataPoint(mAmbientLux, brightness);
        mShortTermModelValid = true;
        mShortTermModelAnchor = mAmbientLux;
        if (mLoggingEnabled) {
            Slog.d(TAG, "ShortTermModel: anchor=" + mShortTermModelAnchor);
        }
        return true;
    }
可以看到,这个家伙最终调用了 BrightnessMappingStrategy 的 addUserDataPoint() 方法,把当前“环境亮度”和用户拖动亮度条设置的“用户亮度”一起传了进去。
继续:
services/core/java/com/android/server/display/BrightnessMappingStrategy.java
        @Override
        public void addUserDataPoint(float lux, float brightness) {
            float unadjustedBrightness = getUnadjustedBrightness(lux);
            if (mLoggingEnabled) {
                Slog.d(TAG, "addUserDataPoint: (" + lux + "," + brightness + ")");
                PLOG.start("add user data point")
                        .logPoint("user data point", lux, brightness)
                        .logPoint("current brightness", lux, unadjustedBrightness);
            }
            float adjustment = inferAutoBrightnessAdjustment(mMaxGamma,
                    brightness /* desiredBrightness */,
                    unadjustedBrightness /* currentBrightness */);
            if (mLoggingEnabled) {
                Slog.d(TAG, "addUserDataPoint: " + mAutoBrightnessAdjustment + " => " +
                        adjustment);
            }
            mAutoBrightnessAdjustment = adjustment;
            mUserLux = lux;
            mUserBrightness = brightness;
            computeSpline();
        }
看起来,用户指定的新亮度被先拿去算了一个 adjustment ,也就是“亮度调整值”,然后“用户亮度”和“环境亮度”被记录了下来,最后调用了重新计算插值曲线的方法,我们接着去看看:
接下来会牵扯到不同的实现(上面说到了亮度映射的两种方式),我们这里选择简单一点的方式一,方式二的整体原理也是大同小异的,只不过会多一层屏幕物理特性的插值罢了:
    private void computeSpline() {
        Pair<float[], float[]> curve = getAdjustedCurve(mLux, mBrightness, mUserLux,
                mUserBrightness, mAutoBrightnessAdjustment, mMaxGamma);
        mSpline = Spline.createSpline(curve.first, curve.second);
    }
可以看到,之前算出来的“亮度调整值”,还有之前临时保存的“用户亮度”和“环境亮度”,被一起塞进了 getAdjustedCurve() ,来创建新插值曲线的数据点,我们进去看看:
    protected Pair<float[], float[]> getAdjustedCurve(float[] lux, float[] brightness,
            float userLux, float userBrightness, float adjustment, float maxGamma) {
        float[] newLux = lux;
        float[] newBrightness = Arrays.copyOf(brightness, brightness.length);
        if (mLoggingEnabled) {
            PLOG.logCurve("unadjusted curve", newLux, newBrightness);
        }
        adjustment = MathUtils.constrain(adjustment, -1, 1);
        float gamma = MathUtils.pow(maxGamma, -adjustment);
        if (mLoggingEnabled) {
            Slog.d(TAG, "getAdjustedCurve: " + maxGamma + "^" + -adjustment + "=" +
                    MathUtils.pow(maxGamma, -adjustment) + " == " + gamma);
        }
        if (gamma != 1) {
            for (int i = 0; i < newBrightness.length; i++) {
                newBrightness[i] = MathUtils.pow(newBrightness[i], gamma);
            }
        }
        if (mLoggingEnabled) {
            PLOG.logCurve("gamma adjusted curve", newLux, newBrightness);
        }
        if (userLux != -1) {
            Pair<float[], float[]> curve = insertControlPoint(newLux, newBrightness, userLux,
                    userBrightness);
            newLux = curve.first;
            newBrightness = curve.second;
            if (mLoggingEnabled) {
                PLOG.logCurve("gamma and user adjusted curve", newLux, newBrightness);
                // This is done for comparison.
                curve = insertControlPoint(lux, brightness, userLux, userBrightness);
                PLOG.logCurve("user adjusted curve", curve.first ,curve.second);
            }
        }
        return Pair.create(newLux, newBrightness);
    }
这是啥啊?莫慌,我们可以看到它做了两件事情,首先,是把 adjustment 也就是 “亮度调整值” 经过一系列数学运算进行了应用。然后对应用后的曲线,调用了 insertControlPoint() 并把“用户亮度”和“环境亮度”传了进去。
看看 insertControlPoint():
    private Pair<float[], float[]> insertControlPoint(
            float[] luxLevels, float[] brightnessLevels, float lux, float brightness) {
        final int idx = findInsertionPoint(luxLevels, lux);
        final float[] newLuxLevels;
        final float[] newBrightnessLevels;
        if (idx == luxLevels.length) {
            newLuxLevels = Arrays.copyOf(luxLevels, luxLevels.length + 1);
            newBrightnessLevels  = Arrays.copyOf(brightnessLevels, brightnessLevels.length + 1);
            newLuxLevels[idx] = lux;
            newBrightnessLevels[idx] = brightness;
        } else if (luxLevels[idx] == lux) {
            newLuxLevels = Arrays.copyOf(luxLevels, luxLevels.length);
            newBrightnessLevels = Arrays.copyOf(brightnessLevels, brightnessLevels.length);
            newBrightnessLevels[idx] = brightness;
        } else {
            newLuxLevels = Arrays.copyOf(luxLevels, luxLevels.length + 1);
            System.arraycopy(newLuxLevels, idx, newLuxLevels, idx+1, luxLevels.length - idx);
            newLuxLevels[idx] = lux;
            newBrightnessLevels  = Arrays.copyOf(brightnessLevels, brightnessLevels.length + 1);
            System.arraycopy(newBrightnessLevels, idx, newBrightnessLevels, idx+1,
                    brightnessLevels.length - idx);
            newBrightnessLevels[idx] = brightness;
        }
        smoothCurve(newLuxLevels, newBrightnessLevels, idx);
        return Pair.create(newLuxLevels, newBrightnessLevels);
    }
逻辑很复杂但是并不难,它根据传进来的“环境亮度”,在原来的映射表中找到合适的位置,然后把“环境亮度”和“用户亮度”作为一组新的数据点插了进去,最后调用 smoothCurve() 对曲线进行了光滑。
所以,看了这么多,松开亮度条的瞬间,究竟对自动亮度策略干了些什么?
- 这一瞬间的“环境亮度”和“用户亮度”(即用户指定的亮度)被记录了下来。
- “用户亮度”被用来计算“亮度调整值”。
- “亮度调整值”被应用于整条自动亮度曲线(映射表)。
- “环境亮度”和“用户亮度”被插入了原来的映射表(曲线)(就是我们在 overlay 中指定的那些)。
- 对映射表(曲线)进行光滑化,得到新的映射表(曲线)。
接下来,我们去看一看这个过程中的一些细节。
“亮度调整值”的意义
接下来,我们将会进入“亮度调整值”的计算过程 ,来从有些数学的角度看看它是怎么出来的。
下面的这段代码,是“亮度调整值”的计算函数,是刚刚略过的东西:
    protected float inferAutoBrightnessAdjustment(float maxGamma, float desiredBrightness,
            float currentBrightness) {
        float adjustment = 0;
        float gamma = Float.NaN;
        // Extreme edge cases: use a simpler heuristic, as proper gamma correction around the edges
        // affects the curve rather drastically.
        if (currentBrightness <= 0.1f || currentBrightness >= 0.9f) {
            adjustment = (desiredBrightness - currentBrightness);
        // Edge case: darkest adjustment possible.
        } else if (desiredBrightness == 0) {
            adjustment = -1;
        // Edge case: brightest adjustment possible.
        } else if (desiredBrightness == 1) {
            adjustment = +1;
        } else {
            // current^gamma = desired => gamma = log[current](desired)
            gamma = MathUtils.log(desiredBrightness) / MathUtils.log(currentBrightness);
            // max^-adjustment = gamma => adjustment = -log[max](gamma)
            adjustment = -MathUtils.log(gamma) / MathUtils.log(maxGamma);
        }
        adjustment = MathUtils.constrain(adjustment, -1, +1);
        if (mLoggingEnabled) {
            Slog.d(TAG, "inferAutoBrightnessAdjustment: " + maxGamma + "^" + -adjustment + "=" +
                    MathUtils.pow(maxGamma, -adjustment) + " == " + gamma);
            Slog.d(TAG, "inferAutoBrightnessAdjustment: " + currentBrightness + "^" + gamma + "=" +
                    MathUtils.pow(currentBrightness, gamma) + " == " + desiredBrightness);
        }
        return adjustment;
    }
这里处理了不少的 edge case,我们先看最一般的版本,也就是最后一个 else 分支。
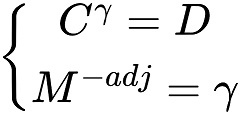
本质上,这块代码就是实现了以下两条公式:
在这里,C 代表 current brightness ,即把“环境亮度”代入默认亮度曲线得到的“默认亮度”。
D 代表 desired brightness,即“用户亮度”。
M 是一个常数,从 overlay 中读取,默认取值为 3 。
γ (gamma) 和 adj (adjustment “亮度调整值”) 都是待求量。
第一条式子只有 gamma 一个变量,我们可以通过两边取对数直接求得结果 gamma = ln(D) / ln(C)。
将结果代入第二条式子,我们可以再通过两边取对数,求得 adj 的值 adj = -ln(gamma) / ln(M)。
所以,它的意义是什么?
从上图中的式子我们已经可以知道,以 gamma 为幂次的变换,可以把“默认亮度曲线”上的一点,变换到理想位置。
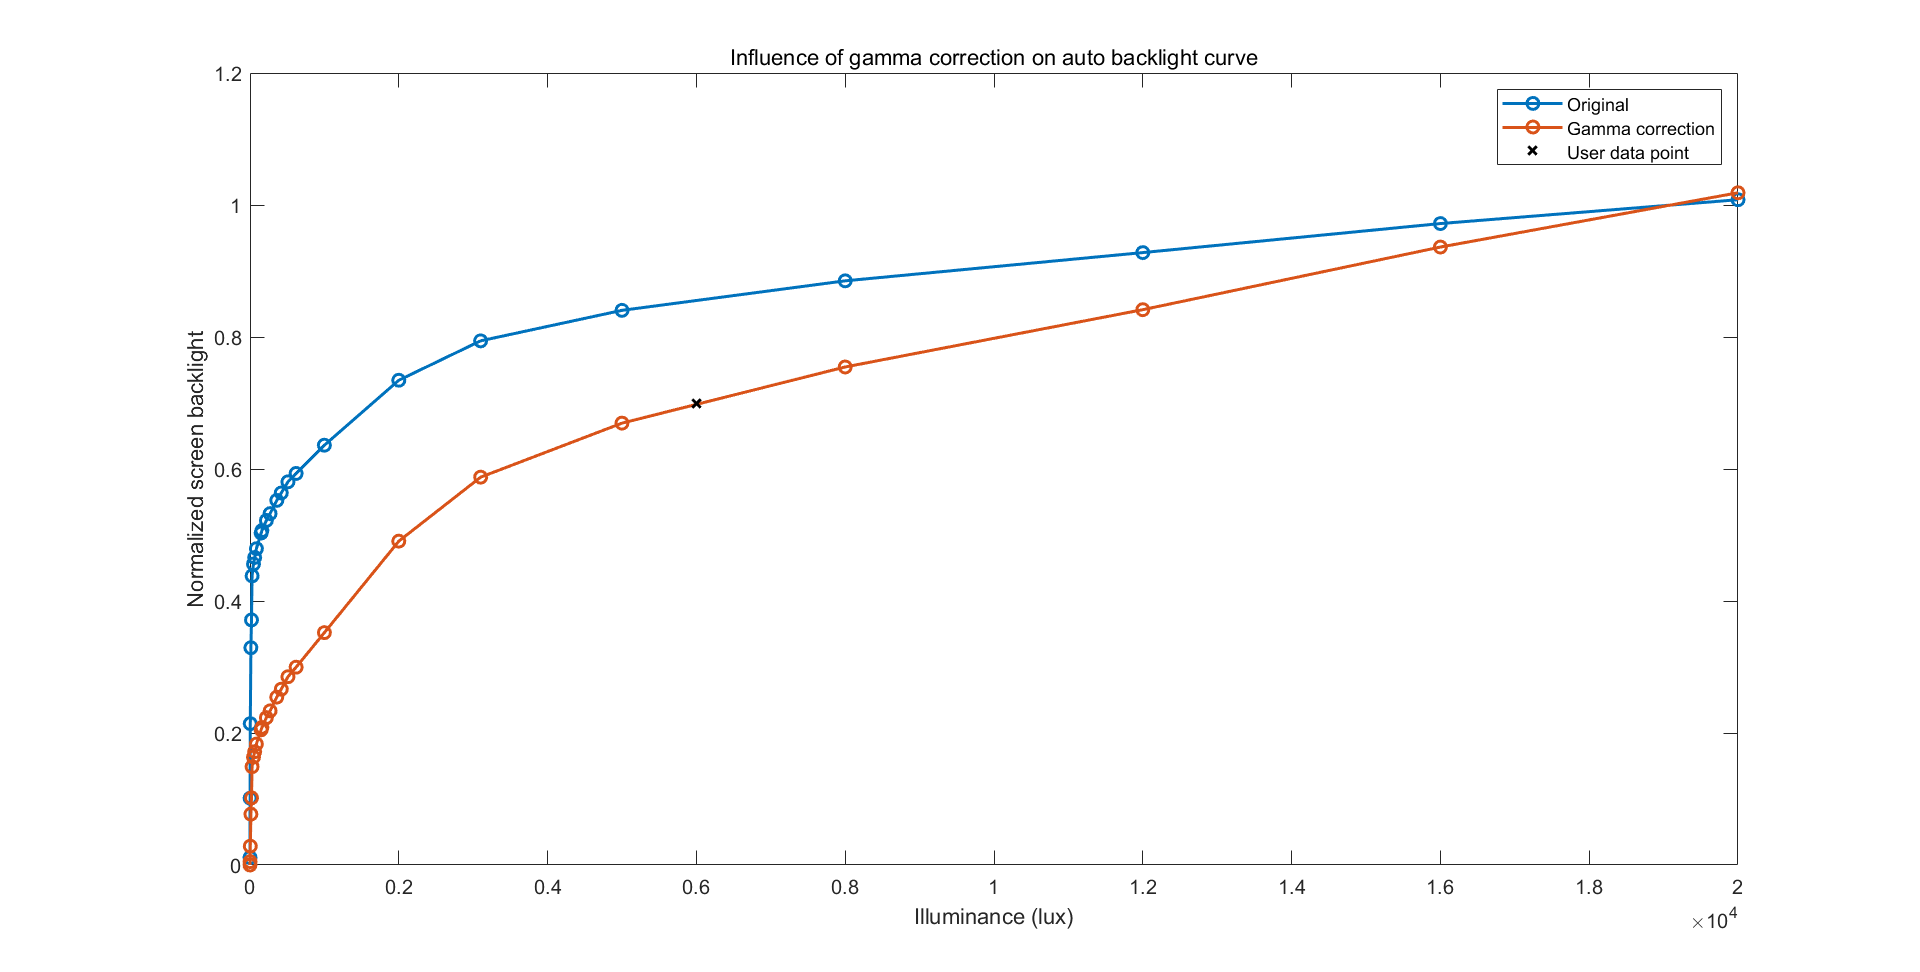
因此假如我们对整条曲线应用该变换,就可以拉高或拉低该曲线,使之通过我们理想的数据点:
当然,为了保证变换的效果符合期待,这里的纵轴,也就是屏幕背光值,都是要进行归一化的。
事实上,自动亮度策略在创建时,会在第一时间对背光值进行归一化。
既然 gamma 代表了这个能够拟合新数据点的变换,那“亮度调整值”又是什么呢?
嗯,其实是另一种奇怪的归一化。
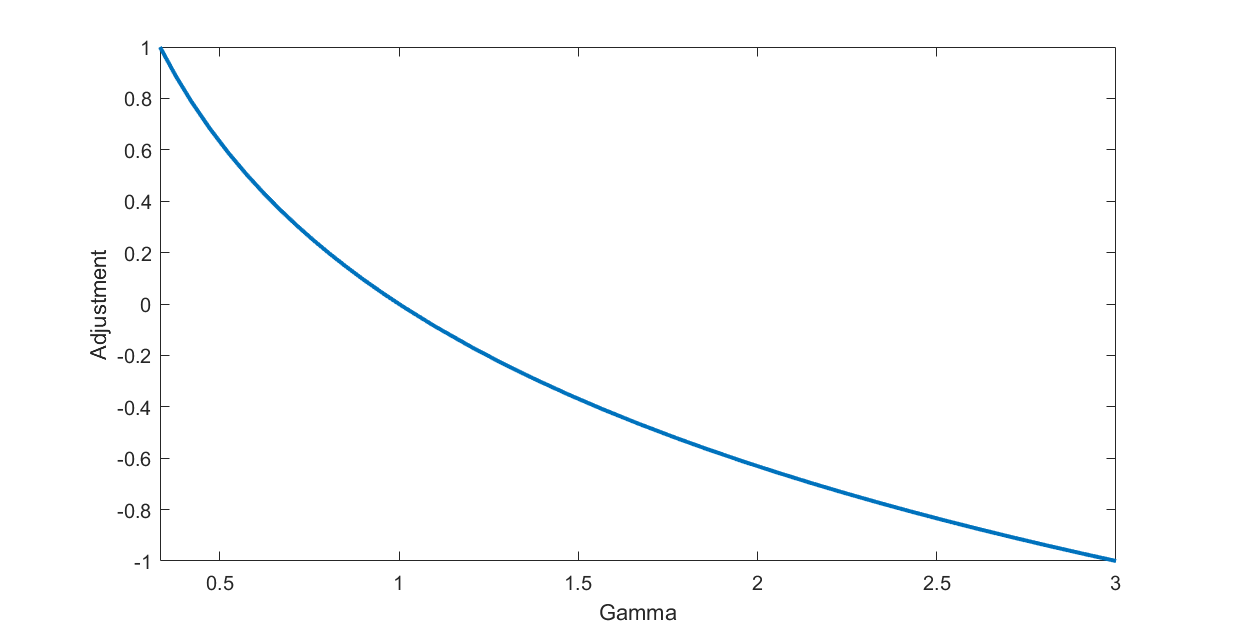
它将 gamma 映射到了一个与 M 有关的空间:
从上面的代码可以看到
adjustment = MathUtils.constrain(adjustment, -1, +1);“亮度调整值”的范围被限制在了 -1 到 1 之间,这反向导致了 gamma 的范围被限制在了 1/M 到 M 之间。
(如上图所示,上图的 M 使用的是默认的 3 )
(你可能会问这 adj 不是从 gamma 算过来的么,限制 adj 怎么会反向限制 gamma 的范围呢?别急接着往下看)
那为什么计算 adj 时要取负号呢?因为观感。我们的归一化范围是 0 到 1,在这个区间上,大于 1 的 gamma 值会导致曲线被下拉,小于 1 的 gamma 值才会导致曲线被上抬。在经过 adj 的计算后,本来大于 1 的 gamma 值被映射到了小于 0 的区间,而小于 1 的 gamma 值被映射到了大于 0 的区间 (不信再看看图),于是,我们就得到了非常符合直觉的 adj 值:
- adj 越大,曲线上抬越多。
- adj 越小,曲线下拉越多。
- adj 达到边界 1 时,曲线上抬达到极限,此时 gamma = 1/M。
- adj 到达边界 -1 时,曲线下拉达到极限,此时 gamma = M。
- adj 为 0 时,对应 gamma = 1,曲线无变化。
上面的函数还只是 adj 的计算过程,这东西还没被应用到曲线呢!
其实在上面的“代码跟踪”中,应用代码已经可以看到了,非常简单:
    float gamma = MathUtils.pow(maxGamma, -adjustment);
    if (mLoggingEnabled) {
        Slog.d(TAG, "getAdjustedCurve: " + maxGamma + "^" + -adjustment + "=" +
                MathUtils.pow(maxGamma, -adjustment) + " == " + gamma);
    }
    if (gamma != 1) {
        for (int i = 0; i < newBrightness.length; i++) {
            newBrightness[i] = MathUtils.pow(newBrightness[i], gamma);
        }
    }
“亮度调整值”被按原路还原回了 gamma,然后以幂的形式进行了应用。
虽然我们保存的是“亮度调整值”而不是 gamma,但在应用时亮度调整值会被还原成 gamma,然后针对整条曲线进行应用。所以我们上面针对 adj 的范围限制,在应用时就会变成 gamma 的范围限制,这就是为什么 gamma 的范围会被 adj 限制在 1/M 到 M 之间。
当“用户亮度”过于变态时,adj 撞到边界,导致曲线移动不足,此时使用 adj 还原出的 gamma 是无法完美拟合的:
以上图为例,此时的 adj 撞到了下界 -1 ,gamma 值为 M ^ 1 = 3。
最后,M 是什么呢?我们已经知道了它的含义:限制最大和最小 gamma 的范围。
于是,它在 overlay 中也有一个非常合理的名字:
    <!-- The maximum range of gamma adjustment possible using the screen
         auto-brightness adjustment setting. -->
<fraction name="config_autoBrightnessAdjustmentMaxGamma">300%</fraction>小结一下:对于一般情况,计算“亮度调整值”时,先利用原亮度值与目标值之间的关系得到幂变换 gamma,再利用 gamma 得到符合直觉的“亮度调整值” adj。adj 被存储了起来,并在应用时被重新转换回了 gamma。最终应用的,就是应用一个以 gamma 为幂次的幂变换,在未触及边界的理想情况下,这个幂变换将拖动原曲线使之经过目标数据点。
上面看了常规的情况,接下来看看 edge case。这次说它是 edge case,是因为它真的在边缘而不是因为很罕见。
在上面的计算代码中,我们可以看到:
    // Extreme edge cases: use a simpler heuristic, as proper gamma correction around the edges
    // affects the curve rather drastically.
    if (currentBrightness <= 0.1f || currentBrightness >= 0.9f) {
        adjustment = (desiredBrightness - currentBrightness);
    ......
在“默认亮度”接近值域边缘时,不再先计算 gamma,而是简单的使用相减来得到 adj 的值。
但是,adj 在被应用时仍然是走的上面的从 adj 反算 gamma 的路线。
于是对于这一种情况,最终应用的是: gamma = M ^ -(D - C)。
由于 adj 不是从 gamma 计算而来的,因此 adj 还原出的 gamma 也没法完美的拟合数据点,甚至只是使曲线向数据点方向略微移动了一点:
之所以要设计这种边缘情况,大概是因为谷歌的工程师认为这种情况下如果仍然计算 gamma,会导致曲线的移动范围过大,从而严重破坏别的亮度下的体验。
还有两种 edge case 由于过于简单就直接忽略了,一种是“用户亮度”拉满,adj 直接设为上界 1;另一种是“用户亮度”拉到 0 ,adj 直接设为下界 -1 ,之所以要独立处理这两种情况大概是因为对数在这种极限情况下很容易出 0 和 无穷,再做一个除法就是妥妥的 NaN 了。
总结:我们现在已经彻底了解了“亮度调整值” adj 的含义,无论在何种情况下,它最终都是被用于还原幂变换系数 gamma 的,公式是 gamma = M ^ -adj。它的来源有两个,在一般且未越界的情况下,它由 gamma 计算而来,能够完美拟合用户数据点;对于值域边缘的亮度,它会被直接计算,此时还原出的 gamma 无法拟合用户数据点,只能使曲线向该方向略微移动。
用户数据点插入与光滑
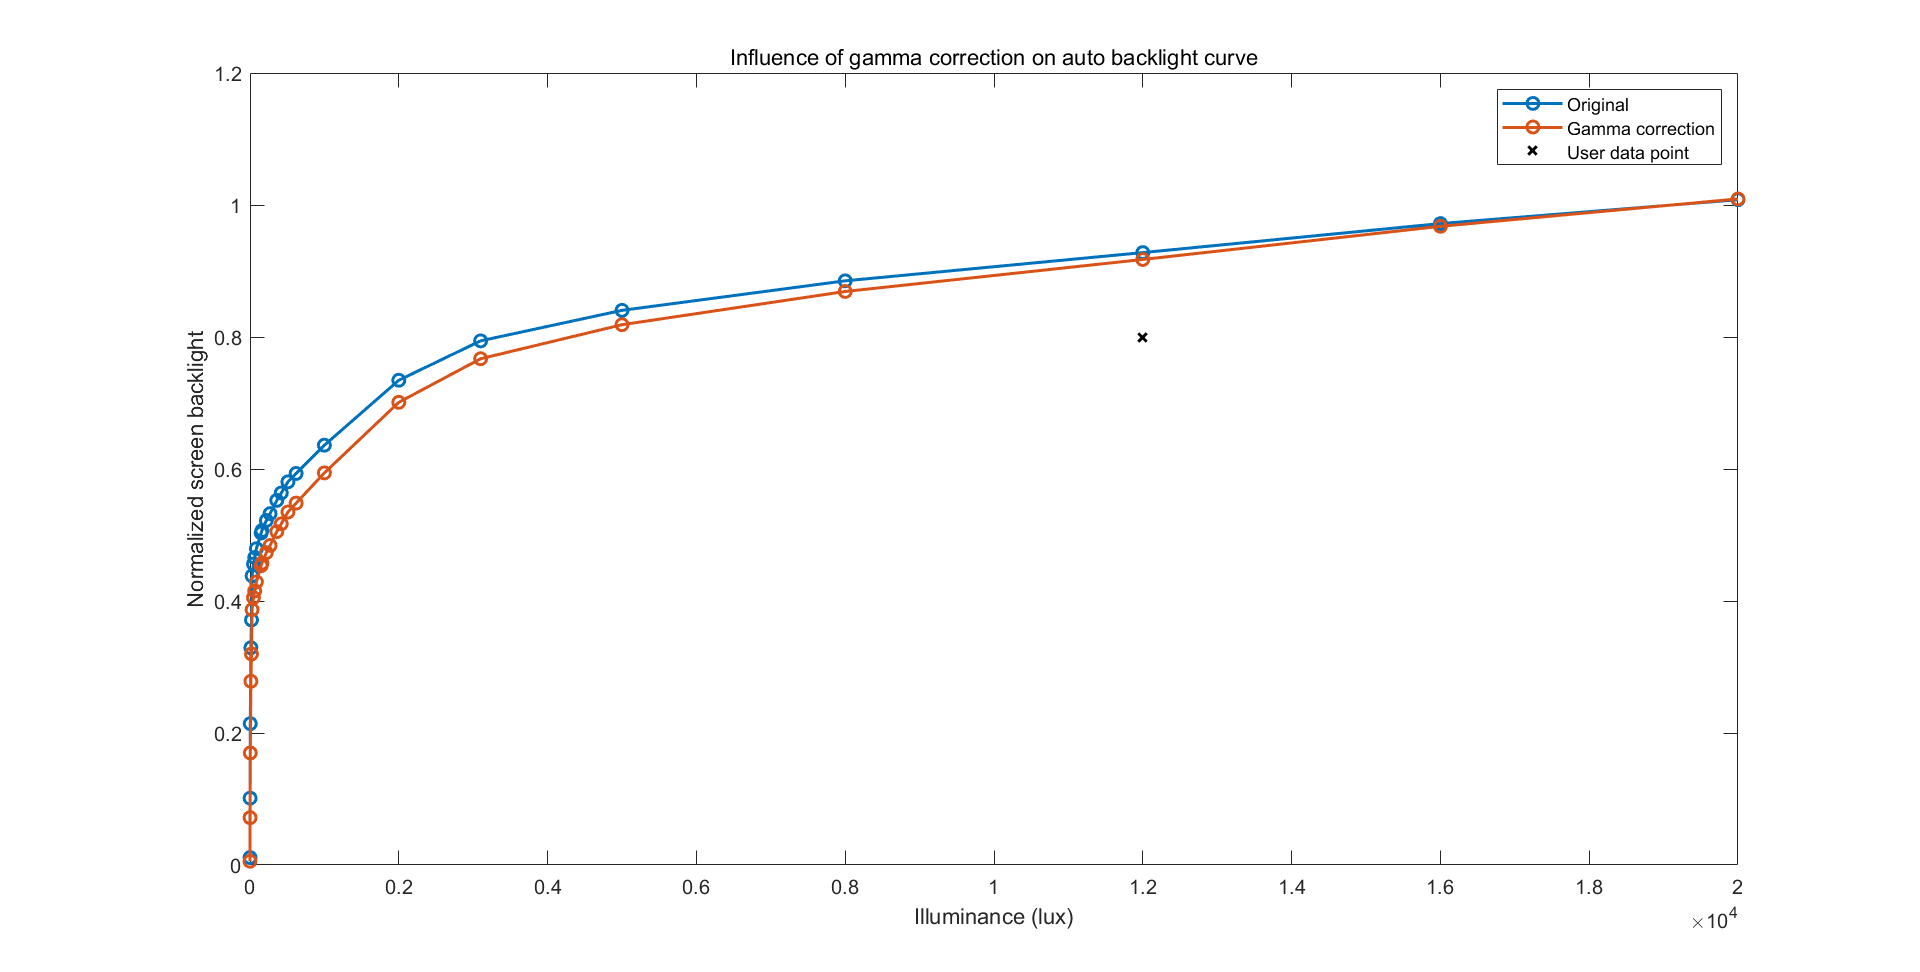
在两种情况下,单靠上面的“亮度调整值”是无法完美进行“用户亮度”拟合的:
- 在“亮度调整值”达到边界时,曲线的移动范围会受到
config_autoBrightnessAdjustmentMaxGamma的限制。 - 在“默认亮度”接近边界时,“亮度调整值”并非由 gamma 计算而来,曲线移动能力受限。
既然无法拟合,那岂不是意味着只要用户一松手,屏幕亮度就会离开“用户亮度”?
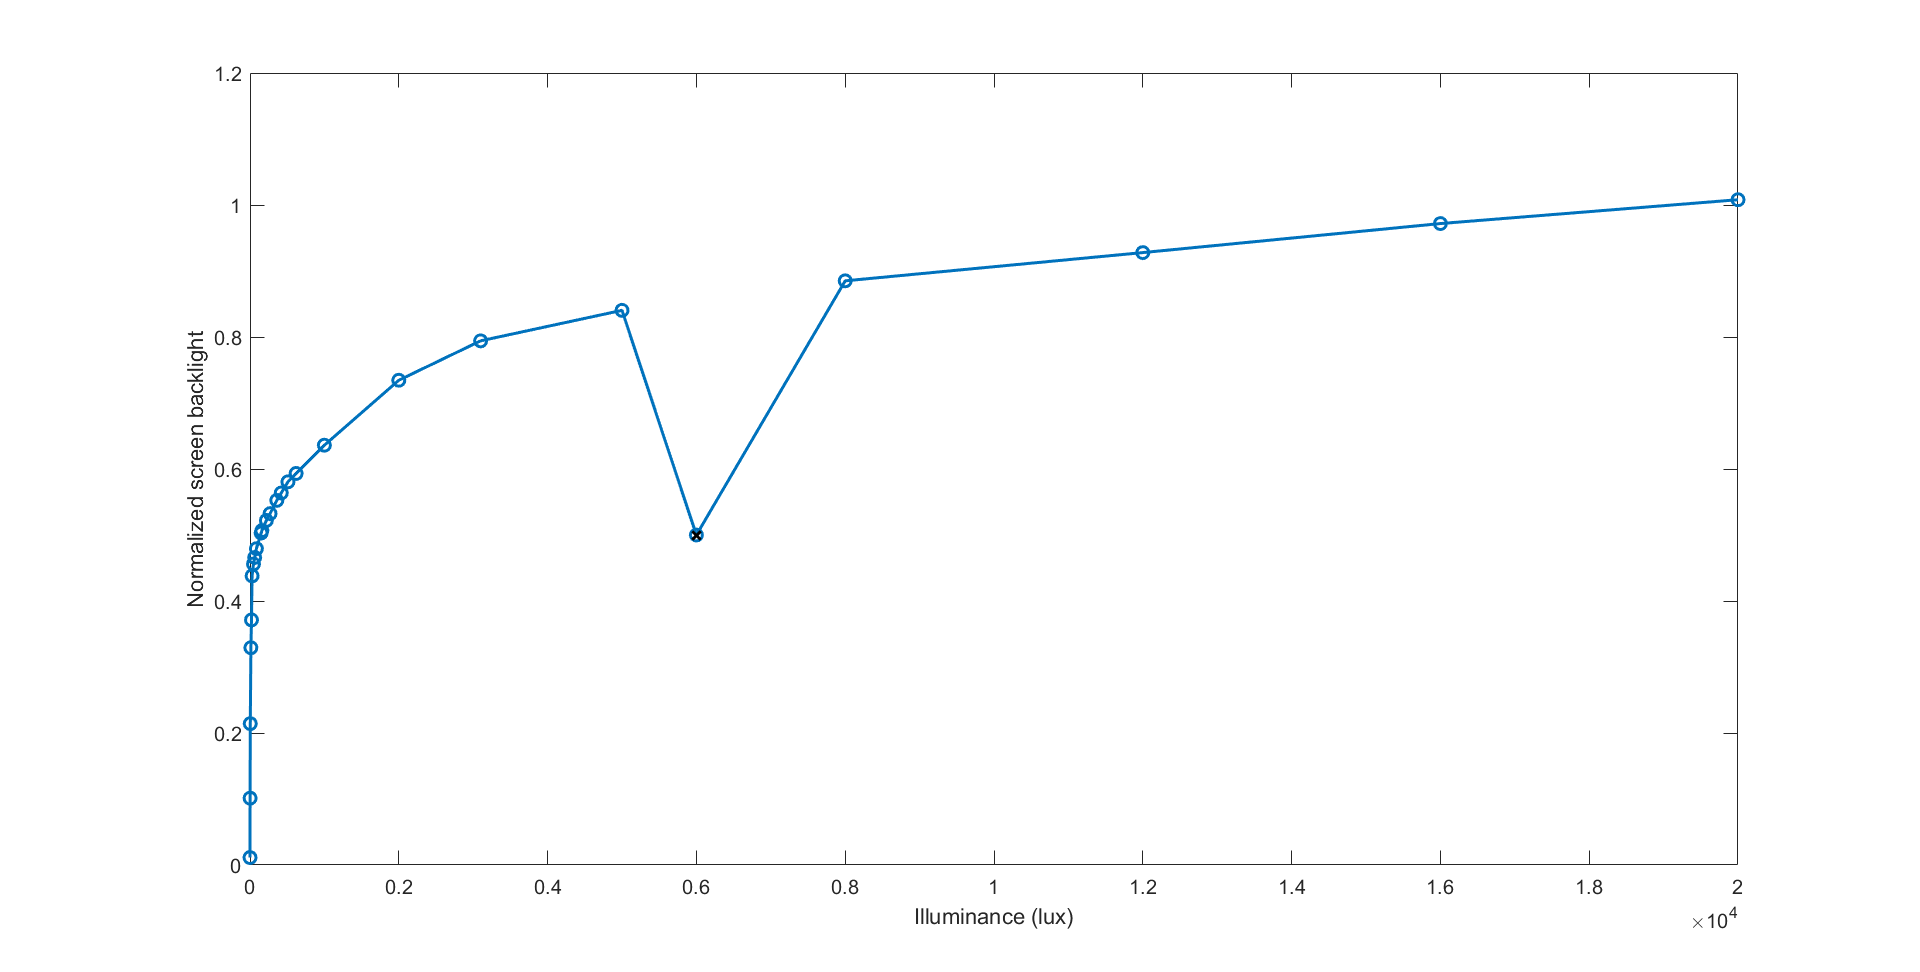
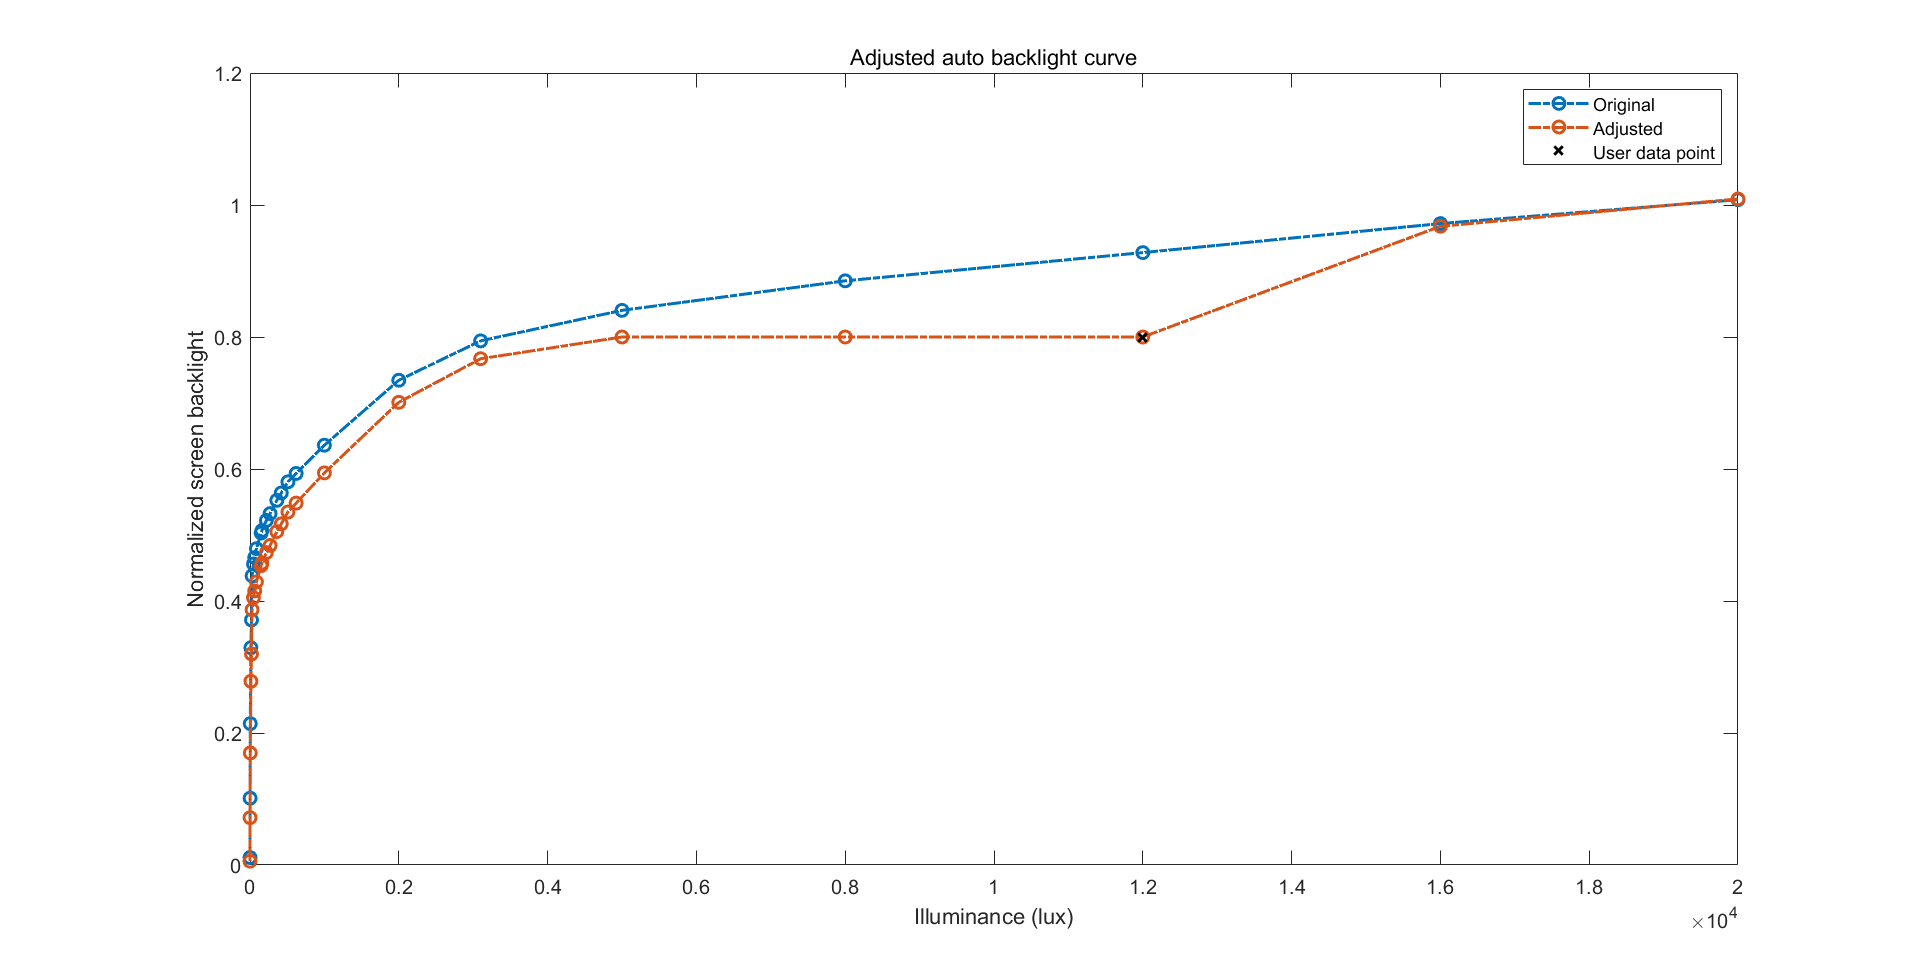
不至于不至于,看起来谷歌的工程师也考虑到了这一点,因此在应用“亮度调整值”后,还会将“用户亮度”和“环境亮度”直接插入到原来的映射表中,确保用户数据点一定位于曲线上。
但是,单纯的插入一个数据点,造成的效果可能是极为糟糕的:
这种操作只拉低了曲线的其中一段,甚至破坏了曲线的单调性,实在是很烂。
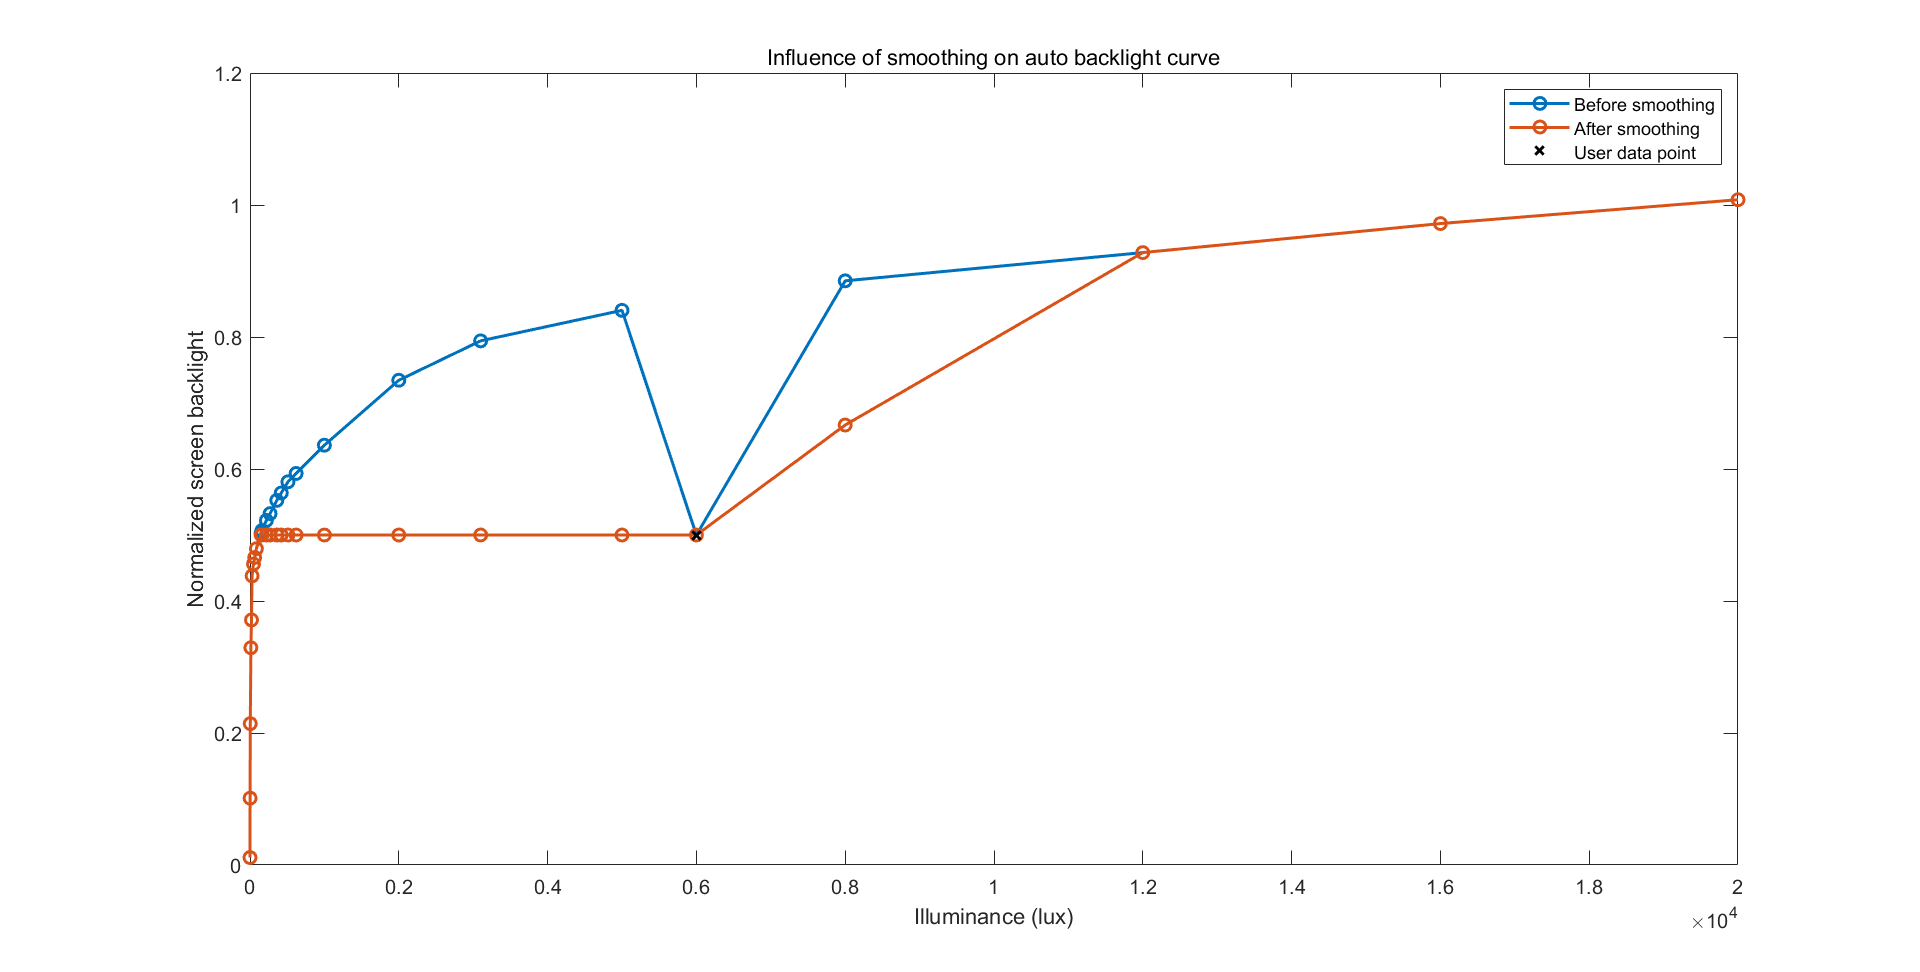
于是,怎么让它变得正常一点呢?这便是上面代码中 smoothCurve() 所做的事:
    private void smoothCurve(float[] lux, float[] brightness, int idx) {
        if (mLoggingEnabled) {
            PLOG.logCurve("unsmoothed curve", lux, brightness);
        }
        float prevLux = lux[idx];
        float prevBrightness = brightness[idx];
        // Smooth curve for data points above the newly introduced point
        for (int i = idx+1; i < lux.length; i++) {
            float currLux = lux[i];
            float currBrightness = brightness[i];
            float maxBrightness = MathUtils.max(
                    prevBrightness * permissibleRatio(currLux, prevLux),
                    prevBrightness + MIN_PERMISSABLE_INCREASE);
            float newBrightness = MathUtils.constrain(
                    currBrightness, prevBrightness, maxBrightness);
            if (newBrightness == currBrightness) {
                break;
            }
            prevLux = currLux;
            prevBrightness = newBrightness;
            brightness[i] = newBrightness;
        }
        // Smooth curve for data points below the newly introduced point
        prevLux = lux[idx];
        prevBrightness = brightness[idx];
        for (int i = idx-1; i >= 0; i--) {
            float currLux = lux[i];
            float currBrightness = brightness[i];
            float minBrightness = prevBrightness * permissibleRatio(currLux, prevLux);
            float newBrightness = MathUtils.constrain(
                    currBrightness, minBrightness, prevBrightness);
            if (newBrightness == currBrightness) {
                break;
            }
            prevLux = currLux;
            prevBrightness = newBrightness;
            brightness[i] = newBrightness;
        }
        if (mLoggingEnabled) {
            PLOG.logCurve("smoothed curve", lux, brightness);
        }
    }

    private float permissibleRatio(float currLux, float prevLux) {
        return MathUtils.pow((currLux + LUX_GRAD_SMOOTHING)
                / (prevLux + LUX_GRAD_SMOOTHING), MAX_GRAD);
    }
代码逻辑看起来复杂,其实还是挺简单的:它从被插值的点处切入,分别向左右逐个检验各个点的数值是否符合要求,若不符合要求则进行纠正,要求如下:
- 首先是单调性,右边的点不能小于左边的点。
- 其次是增长率(插值点往右)或下降率(插值点往左,因为它是从插值点往左逐个检验的,所以看成下降),不能超过一定的数值,而这个数值正是
permissibleRatio()所计算出来的。之所以要限制曲线的变化速率,大概是为了能够把大的跳变转为多个点的连续变化,从而让曲线尽量变得“光滑”。
可以看看把上面的曲线进行了光滑化之后的效果:
呐,是不是很符合上面的分析?
最终的“用户亮度”拟合方式
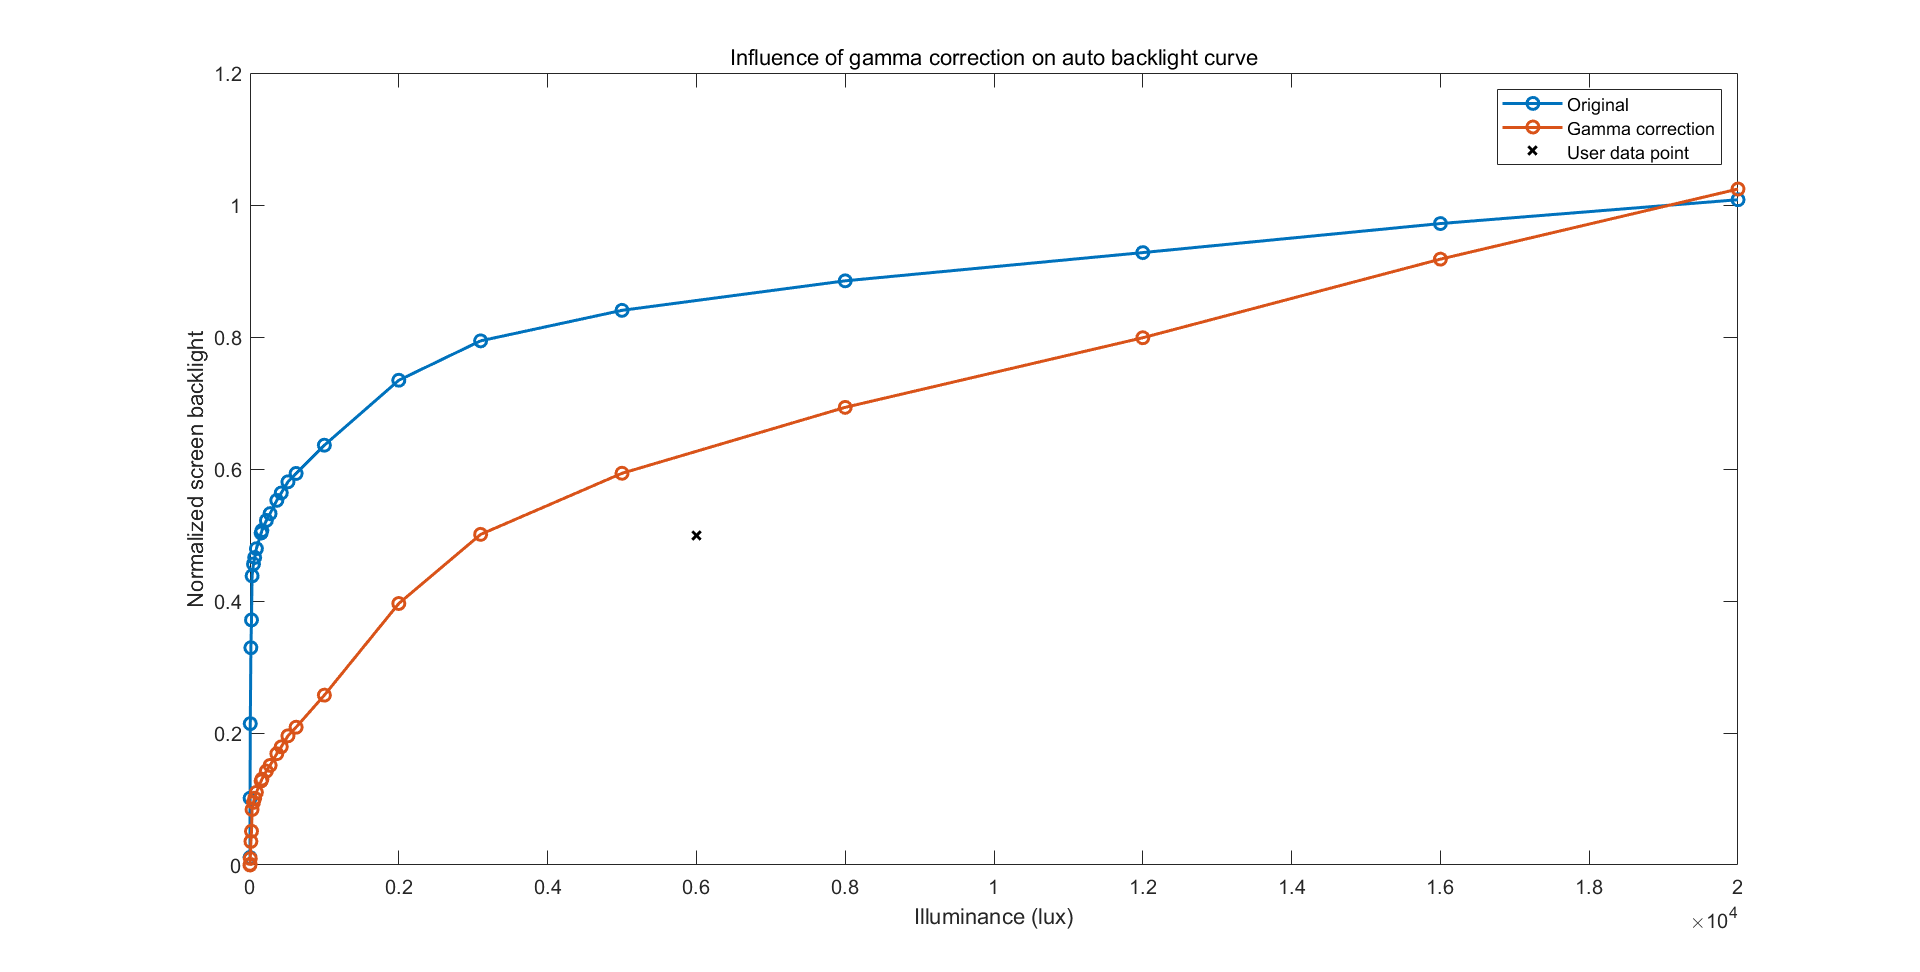
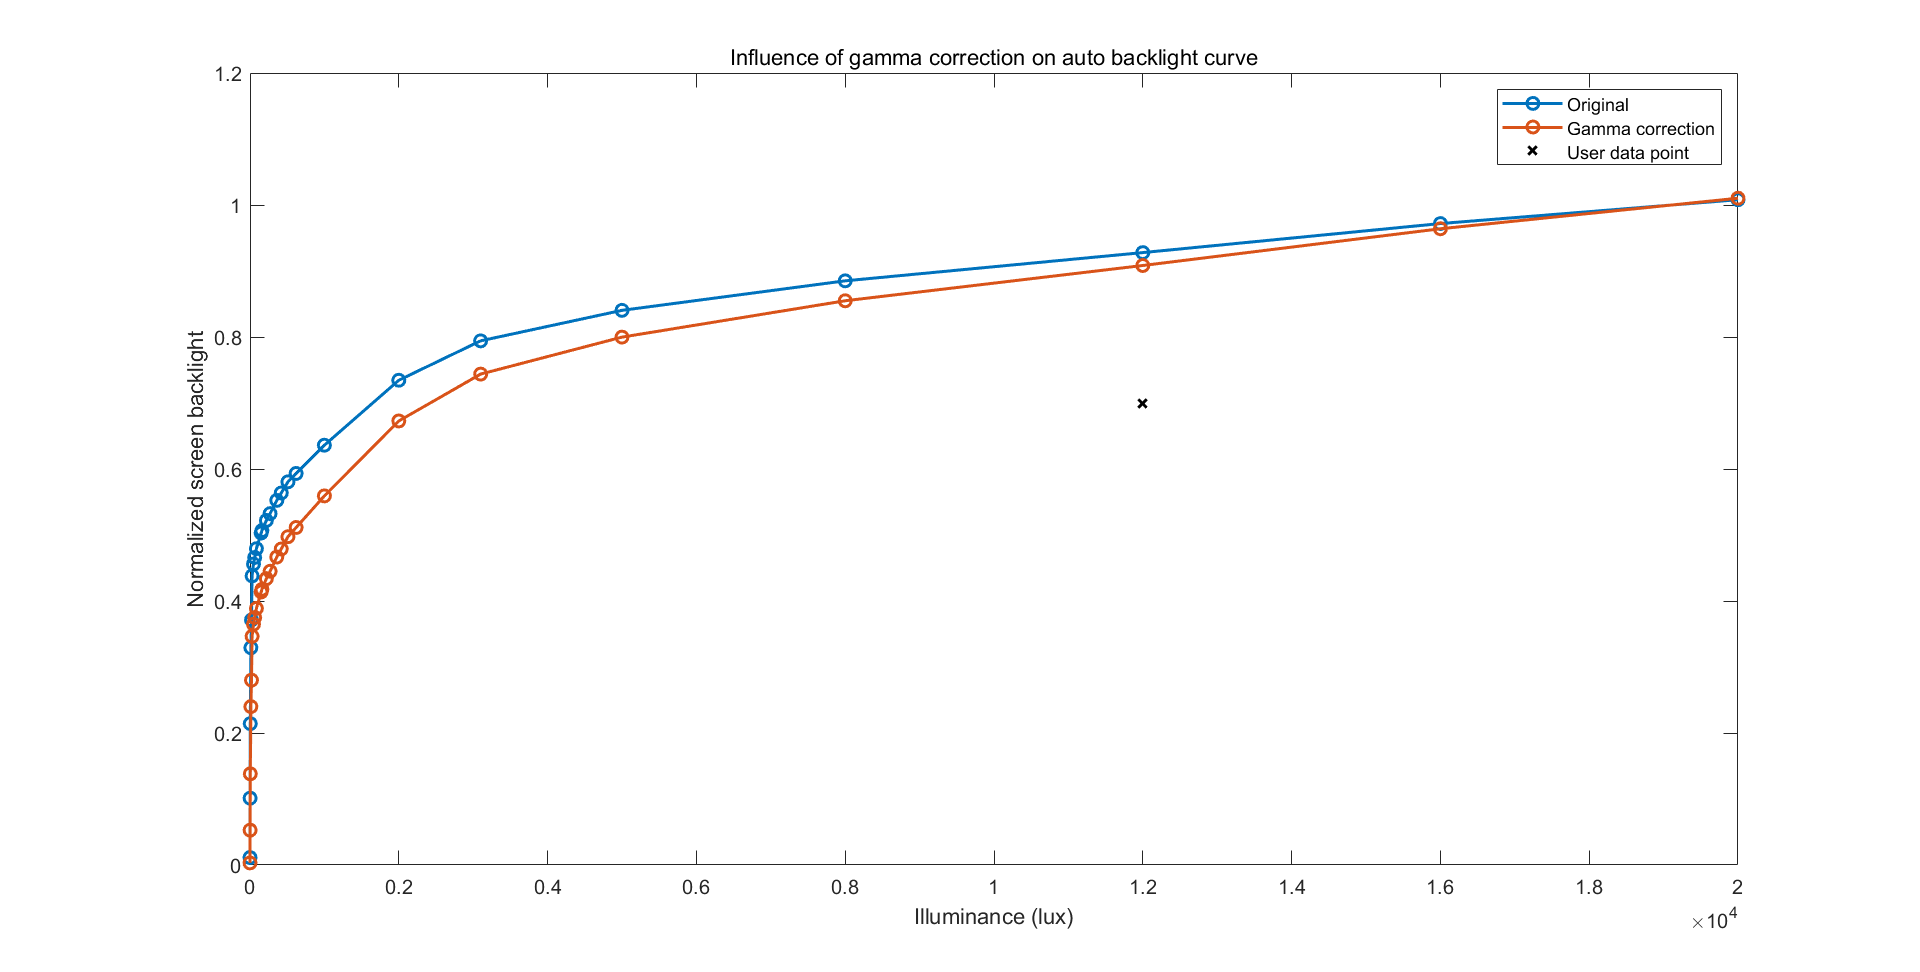
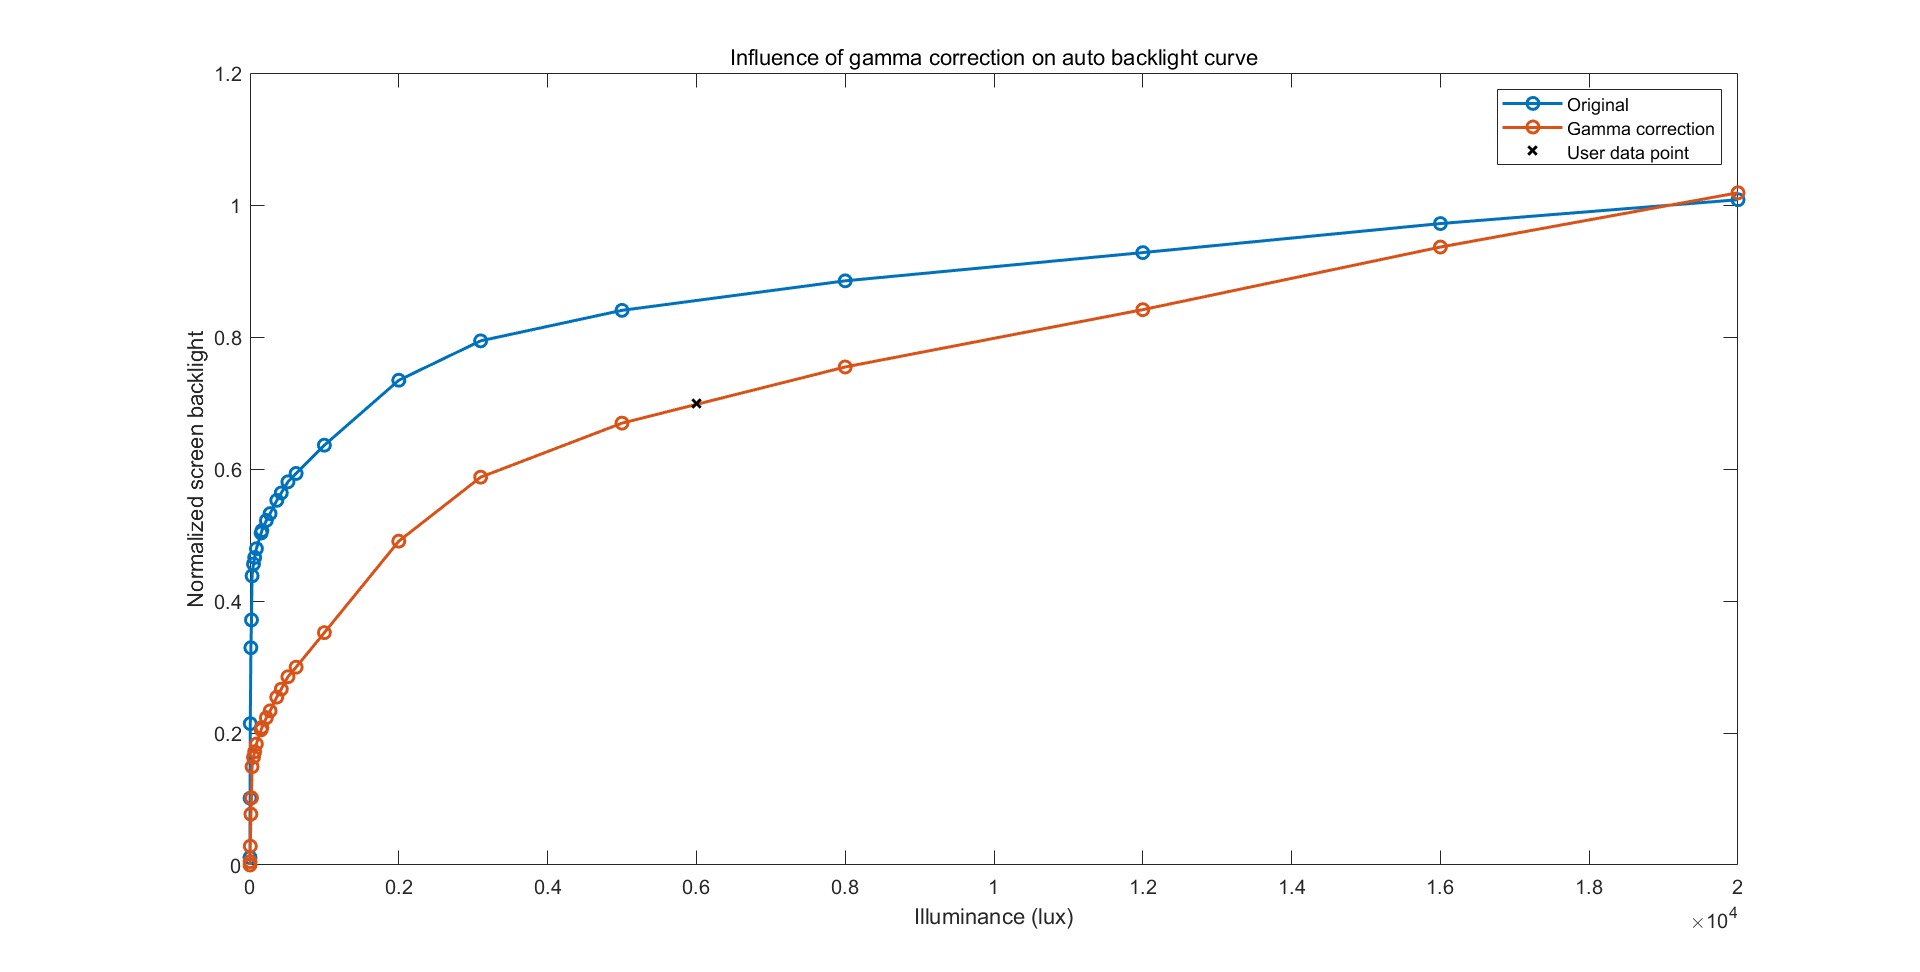
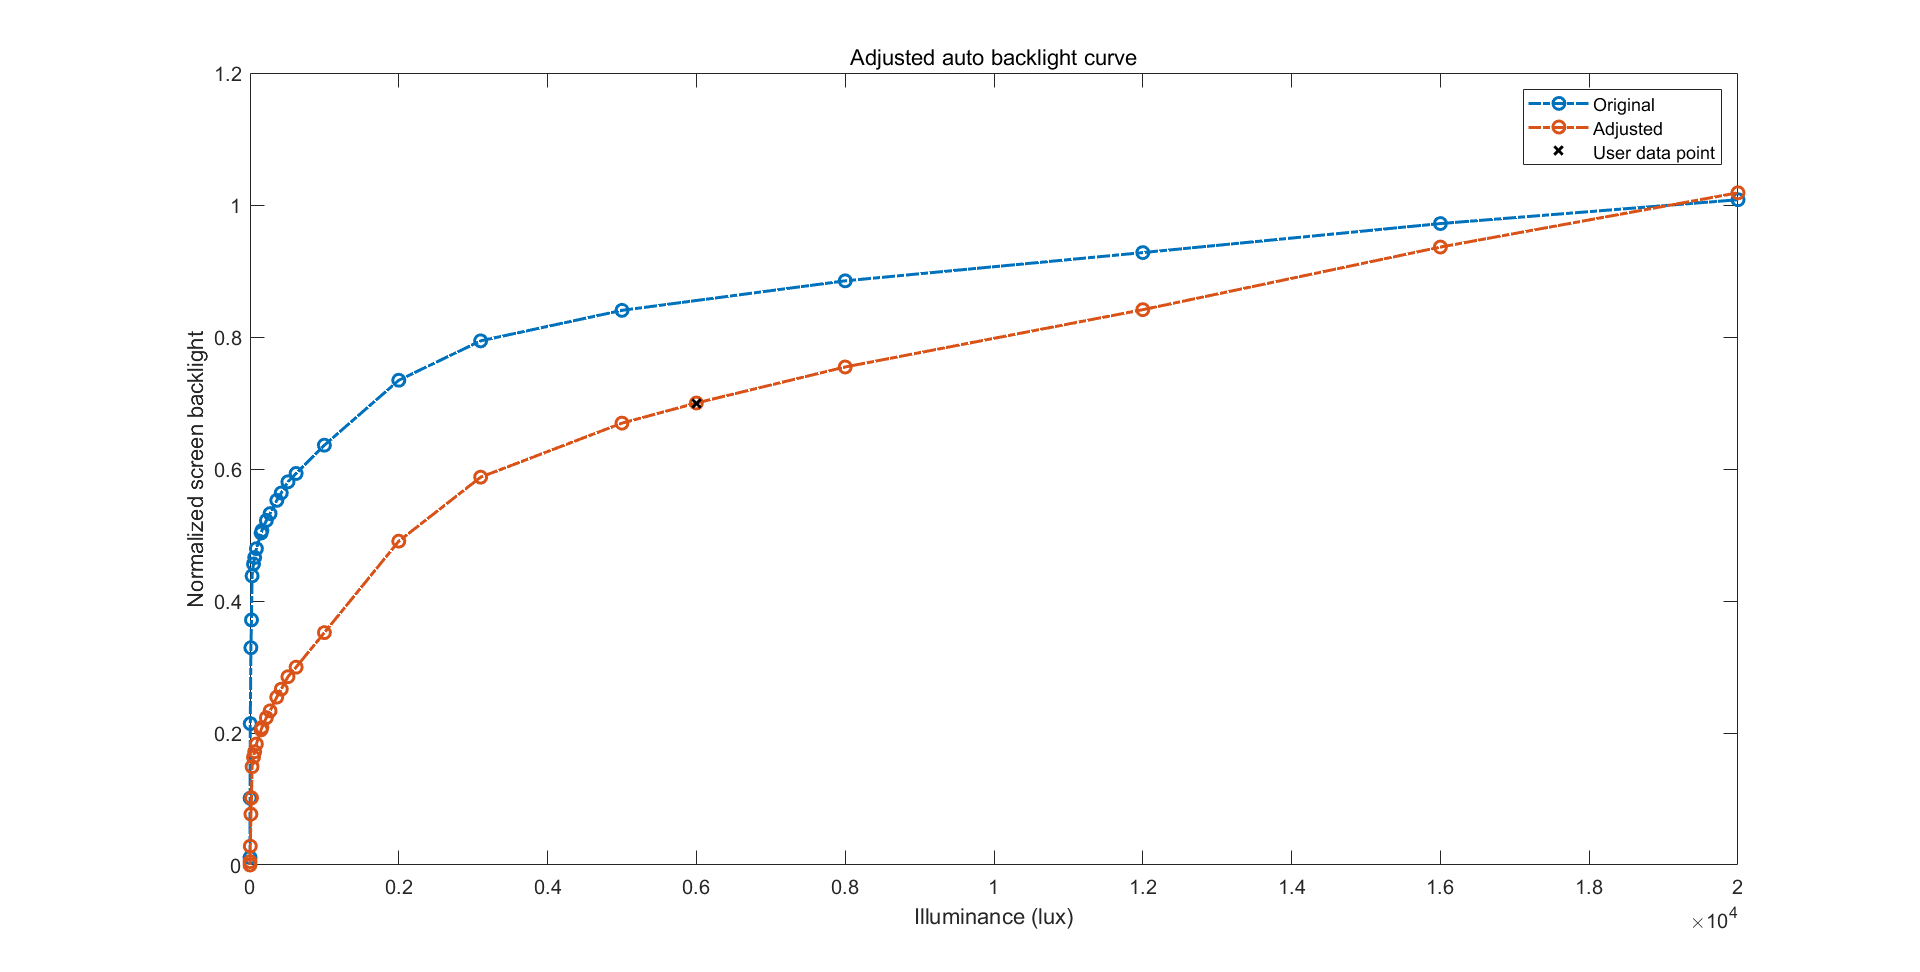
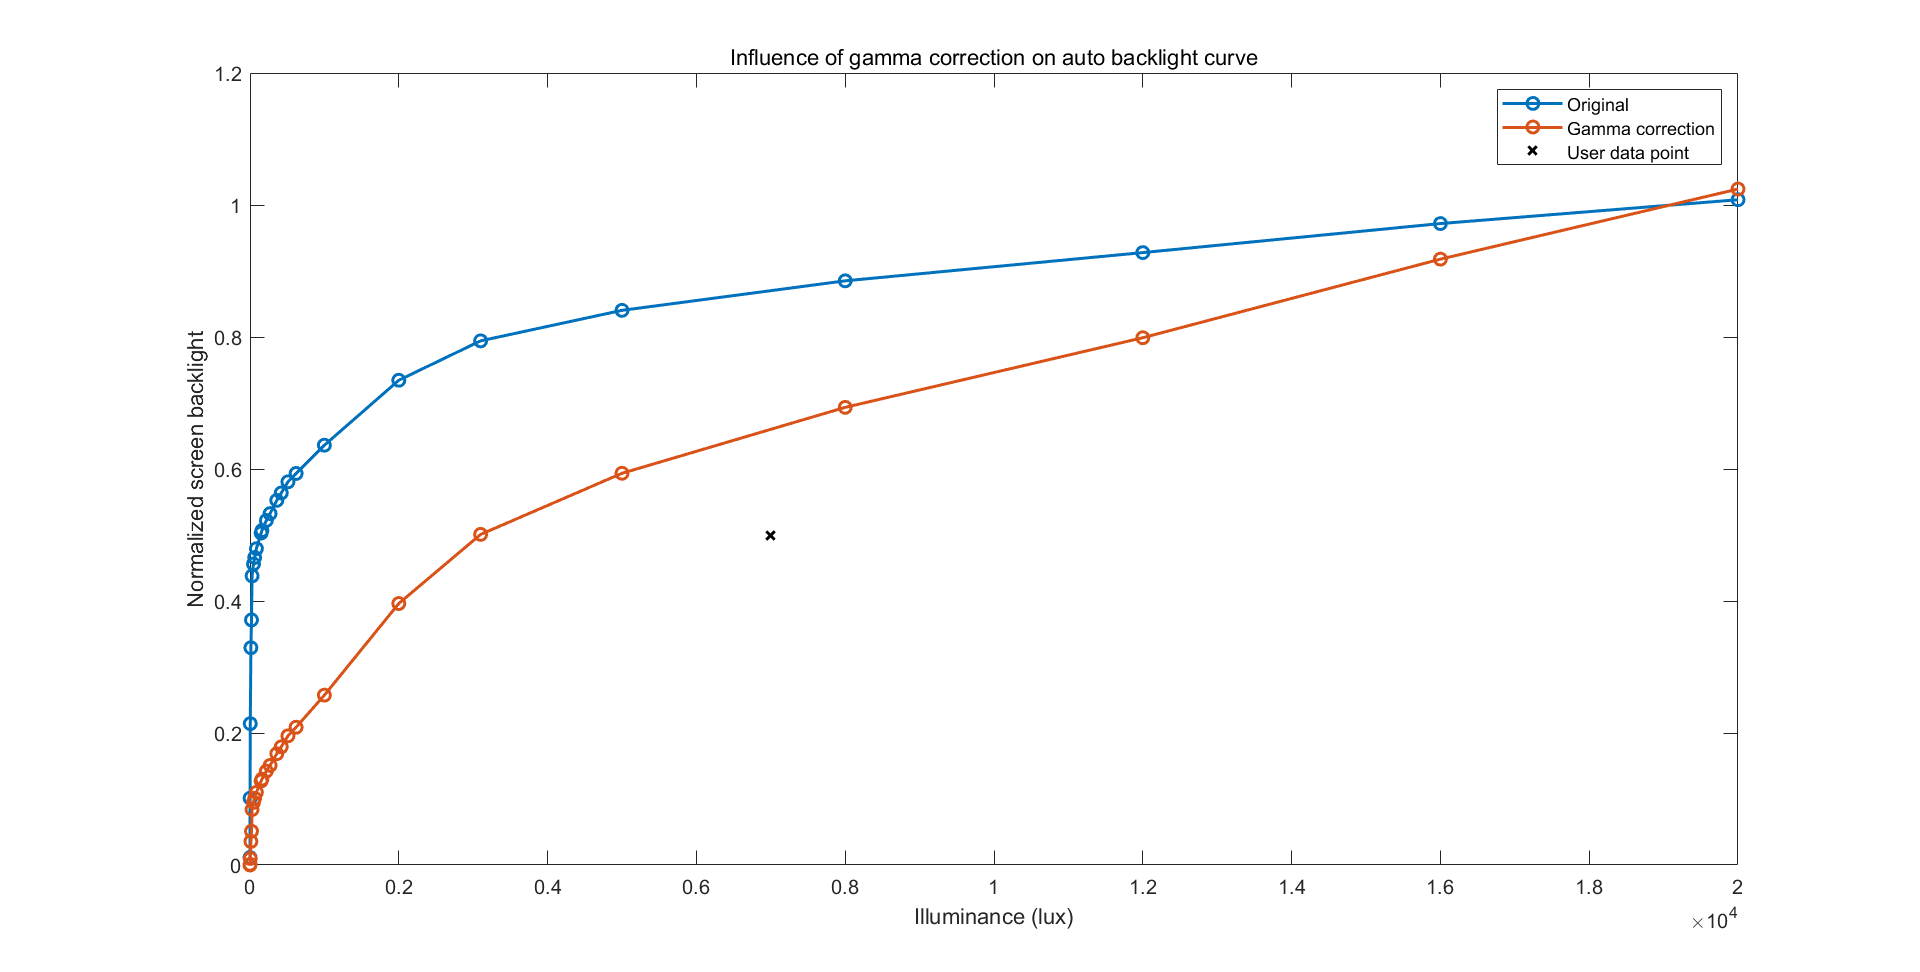
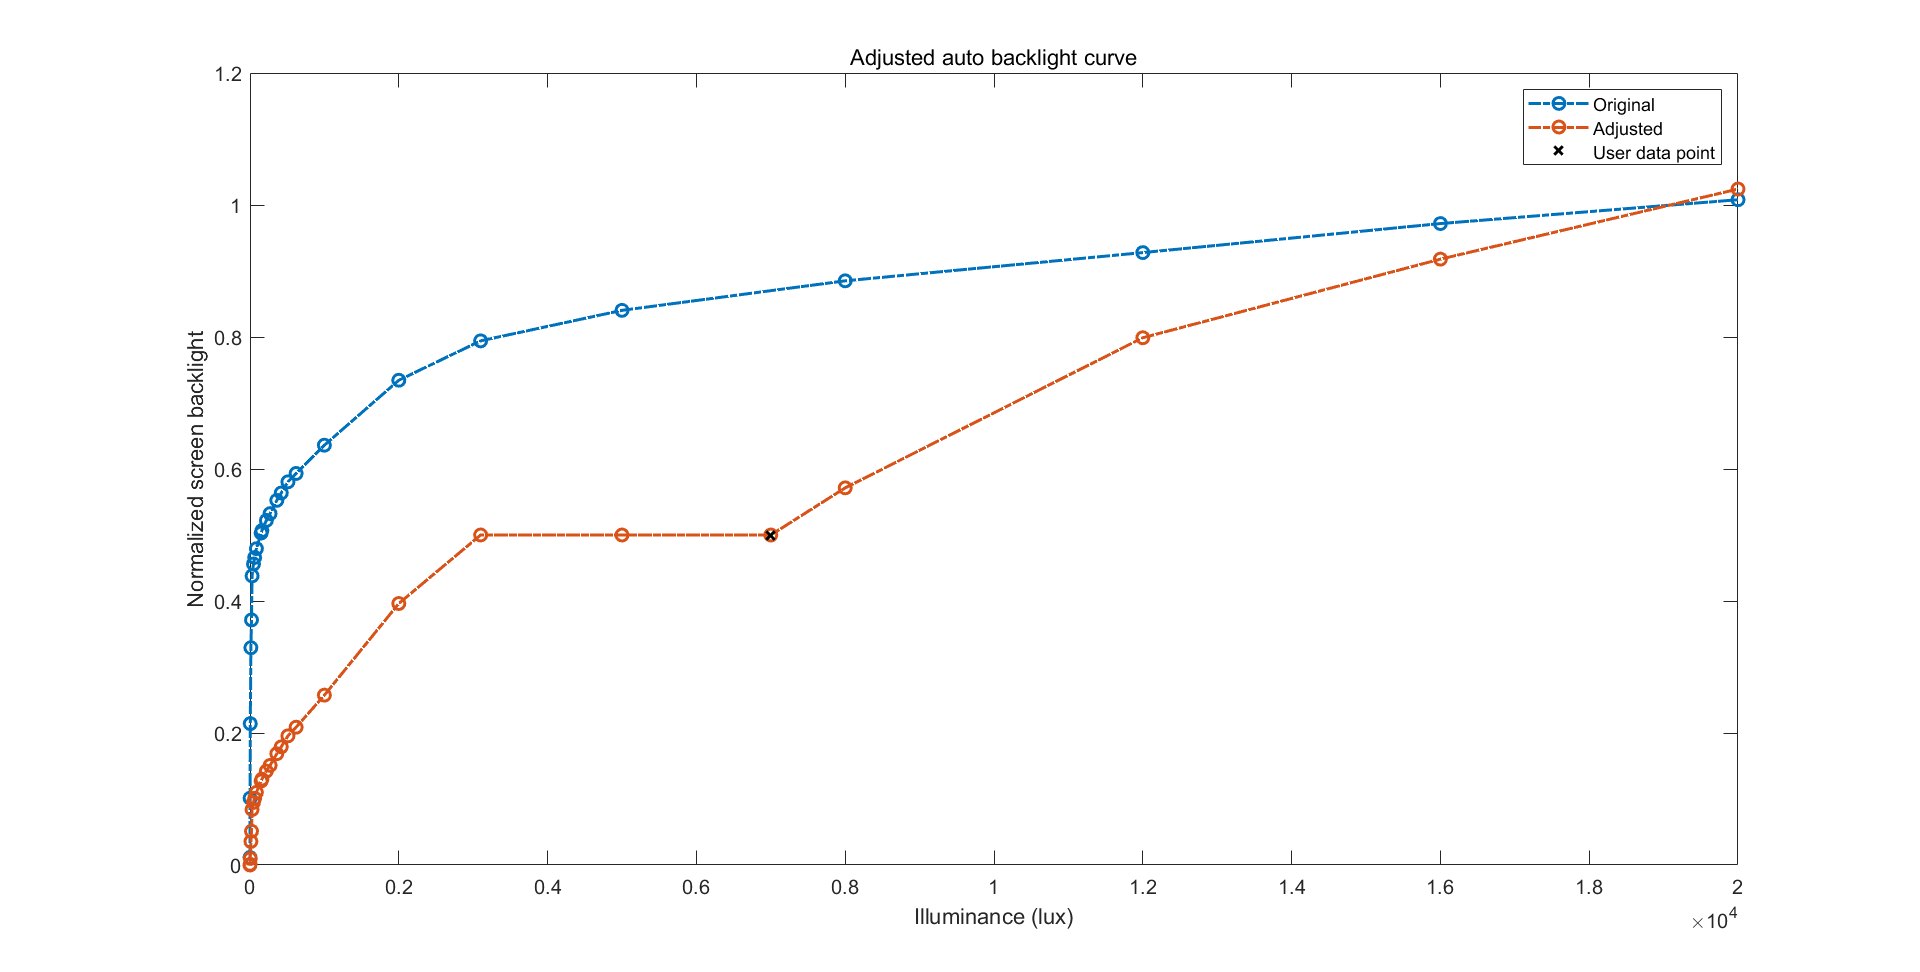
从上面的“代码跟踪”中可以看到,AOSP 最终采用的策略是先应用“亮度调整值”进行一个幂变换,然后插入用户数据点并光滑曲线,确保在幂变换不足时“用户亮度”也能得到拟合。
那就来看看效果吧。
(第一张图是仅应用“亮度调整值”的效果,第二张图则是加上用户数据点与光滑后的最终效果)
先来看一个案例,这个案例中,“亮度调整值”所带来的幂变换本身就已经足以完成拟合,因此插入数据点并没有带来很大的意义:
再来看一个案例,这次,“亮度调整值”撞到边界了,但是插入数据点的操作力挽狂澜:
最后一个案例,这次,处于“边缘情况”,“亮度调整值”本身是不足以拟合数据点的:
好了,我相信现在,你对“亮度调整值”和“插入用户数据点再光滑”各自对于最终结果的意义,有了一个更深入的了解。
对了,“用户数据点”是一次性的,插进了下一个点上一个点会自己失效,因此别想着手动画出一条完美曲线👀
小结
通过这一整块的内容,我们梳理了自动亮度的两个核心:
- 环境照度是如何被映射为背光值的。
- 用户拖动亮度条是如何影响亮度曲线的。
一点自言自语
骗子
安卓 9 不是引入了所谓的“人工智能自适应亮度”么?那么,在上面的分析中,你看到它了吗?其实这个东西压根就没有进入 AOSP ,它只存在于谷歌的闭源组件当中。这正是在 Pixel 上你可以通过“快速关开自动亮度”来实现重设偏好,而在 AOSP 上压根没有反应的原因。
你甚至可以找到为这个组件开的后门:
    /**
     * Sets the global display brightness configuration.
     *
     * @hide
     */
    @SystemApi
    @RequiresPermission(Manifest.permission.CONFIGURE_DISPLAY_BRIGHTNESS)
    public void setBrightnessConfiguration(BrightnessConfiguration c) {
        setBrightnessConfigurationForUser(c, mContext.getUserId(), mContext.getPackageName());
    }
这个隐藏 api,可以做到轻松替换整条亮度曲线,甚至是为单个应用设置亮度偏好(比如降多少尼特)。
(不过它只对上面的方式二有效)
于是乎,假如你有兴趣,你完全可以写一个自定义亮度曲线的软件。
继续骗
你是否曾经有一种幻觉,认为 AOSP 可以“学习”你的亮度偏好,毕竟设置里写着 帮助“自适应亮度”功能了解您偏好的亮度。
就算它没有人工智能,上面的“亮度调整值”和“用户数据点插入”也算是一种学习吧?
大错特错,它只是临时学一下(演你),过一会儿就忘了。
甚至你还可以配置一个“忘记时间”的 overlay:
    <!-- Timeout (in milliseconds) after which we remove the effects any user interactions might've
         had on the brightness mapping. This timeout doesn't start until we transition to a
         non-interactive display policy so that we don't reset while users are using their devices,
         but also so that we don't erroneously keep the short-term model if the device is dozing
         but the display is fully on. -->
    <integer name="config_autoBrightnessShortTermModelTimeout">300000</integer>
时间到了,并且它描述的其它条件也满足时,它会主动清除用户数据点,主动还原“亮度调整值”,让一切都变回最原始的状态。
啊,真不错,blame 了一下这个东西也是安卓 9 引入的。看来谷歌可能认为 Short Term Model 到期了,就该由刚刚学习到新鲜数据的人工智能模型接替工作了吧,可是 AOSP 根本就没有这个人工智能啊喂。于是,你拉了亮度条,过了一会儿,它忘了,于是你又拉亮度条,心中还满怀期待的认为多来几次,它总会学会。真是一个感人至深的故事。
所以说,安卓 9 引入的这套东西实际上对于纯 AOSP 的自动亮度体验来说就是一个大倒车。在安卓 9 之前,拖动亮度条直接改变的是“亮度调整值”。虽然没有用户数据点,但也不至于主动忘记用户偏好啊。
于是写了几个提交,至少让 adjustment 能被记住,对于我这种喜欢“暗一点”自动亮度的人有很大帮助:
帮助“自适应亮度”功能了解您偏好的亮度 对于 AOSP 来说,真是一个莫大的讽刺。
adjustment 的设置更新路径
“亮度调整值”是存在于 System Settings 数据库中的。
    /**
     * Adjustment to auto-brightness to make it generally more (>0.0 <1.0)
     * or less (<0.0 >-1.0) bright.
     * @hide
     */
    @UnsupportedAppUsage
    @Readable
    public static final String SCREEN_AUTO_BRIGHTNESS_ADJ = "screen_auto_brightness_adj";
对于早于安卓 9 的版本,这个值的更新路径大概是这样的:移动亮度条 -> 修改设置 -> system server 监听设置 -> 更新曲线 gamma。
但是对于新于安卓 9 的版本,拖动亮度条不会直接改变 adj,而是将“用户亮度”告知相关组件,由它们计算适合的 adj。
更新路径就变成了:移动亮度条 -> 传递用户亮度到 system server -> 计算 adj -> 保存 adj。
保存 adj 的过程位于屎山 updatePowerState() 中:
    ......
    if (autoBrightnessEnabled) {
        brightnessState = mAutomaticBrightnessController.getAutomaticScreenBrightness();
        newAutoBrightnessAdjustment =
                mAutomaticBrightnessController.getAutomaticScreenBrightnessAdjustment();
    }
    ......
    if (autoBrightnessAdjustment != newAutoBrightnessAdjustment) {
        // If the autobrightness controller has decided to change the adjustment value
        // used, make sure that's reflected in settings.
        putAutoBrightnessAdjustmentSetting(newAutoBrightnessAdjustment);
    }
    ......
但是,安卓 9 以上的版本仍然保留了直接写入 Settings 来改变 adj 的操作路径,大概是为了兼容性吧:
    mAutomaticBrightnessController.configure(autoBrightnessEnabled,
            mBrightnessConfiguration,
            mLastUserSetScreenBrightness,
            userSetBrightnessChanged, autoBrightnessAdjustment,
            autoBrightnessAdjustmentChanged, mPowerRequest.policy);
在屎山 updatePowerState() 配置自动亮度的时候传入的 autoBrightnessAdjustment 便是从设置读取的 adj,而 autoBrightnessAdjustmentChanged 则标志着设置是否发生了改变。只有在设置改变时 autoBrightnessAdjustment 才会被采用。正常情况下 autoBrightnessAdjustmentChanged 基本永远是 false,除非你手动写入系统设置。这些屎在第一次看代码的时候非常具有迷惑性,非常让人误以为这是新算出来的 adj,甚至让人觉得自动亮度偏好就是从这条路径更新的,实际上它们只是为了兼容性而保留的旧路径。
尾声
这也算是写过的最长的 blog 了,主要是很多东西并不是三言两语就能说清楚的,特别是一些理论铺垫和验证还是蛮花时间的。
这篇文章主要还是聚焦于自动亮度的算法,对于传感器数据预处理方面的算法并没有怎么涉及,主要是我不怎么感兴趣(笑
仿真自动亮度曲线所使用的 MATLAB 代码已经开源在了 Github .
Take a look if you are interested.
感谢エキ在写这篇文章期间对我的支持。

他妈真屎山,服了